Hello everyone,
Welcome to all of you who were not in class the first week of class.
Please, the first thing I would like you to do is send me an email (carterdjohnson@aim.com) if you did not do this in class. Please type the following information in the email: your name, your ID#, and then type your class (DMA111), and the section (this is the number that follows DMA111 on your schedule).
I was very happy with the way class turned out this week. You all did quite well with the material and picking up the notion of layers, symbols and motion tween animation even though I forced you to do quite a lot.
Although I did cover a few other things, this weeks posting primarily concerns itself with symbols and motion tweens.
Below you will find the posting for this week's class. It details all of the same issues that we covered in class, namely the drawing and animation. I have also included here a lesson, which we did not cover in our last class, on drawing and animating a fish. Do this if you wish to have extra practice with the issues of symbols, motion tweens, layers, and easing. Please do not hesitate to email me or find me at TCI if you have any difficulties or questions.
If you follow the instructions at the bottom of this posting, you should be able to complete the following brief animation of the bouncing ball.
Remember, please complete this bouncing ball & its shadow for one of your homework exercises, and please do your own work.
Carter-
- TOPICS: Symbols and the Library, Symbol Edit Mode, Symbol Effects (brightness/tint/alpha), Motion Tweens with Symbol Effects.
- LINK Creating Symbols;
- LINK Symbol Library;
- LINK Editing Symbols
- LINK Breaking-Apart Symbols
- LINK Symbol Effects;
- LINK Motion Tweens with Symbol Effects;
- LINK more with Motion Tween Animations
- LINK more on Color Gradients
- LINK more on Symbol Effects (brightness, tint, alpha) and their use in Motion Tweens,
- LINK more on Scaling Objects and their use in Motion Tweens
- LINK Easing Motion Tweens IN/OUT
- LINK Bouncing-Ball Animation
- HOMEWORK: Over the next several weeks, we will be working on your mid-term projects. Please read the handout about the snowman story and storyboarding below. I will discuss it in more detail in the next class.
- Due by NEXT week:
- Flash Drawing—After you read the download for the Snowman Animation, you should create the landscape for this animation in FLASH which should include the following: the ground, the mountains, a snowman, a sun, some clouds, and a tree. Since this class is an animation course, we will be creating a couple animations, one due on the last day of class, and the other due at mid-term, week 6 or 7 of the term, which is only 3 or 4 weeks away. This is not much time really, so please do not get behind. The more time you give yourself the better your work will be. Creativity is always rewarded in this class, so free yourself and your mind, be experimental and adventurous.
- also Due NEXT week:
- Animation—You must begin experimenting with your animation. I know that I have not demonstrated how to begin this yet, but you should try doing it yourselves al on your own nonetheless. EXPERIMENT and try to figure out for yourself. It is all right if you do not succeed. I like to see when people make attempts even if they don't work out; but you do have got to put some time into it if you want to succeed, and there's no time like the present to begin this. Read the first paragraph of the Snowman Story and complete this part of the animation by next week. This must occur in the scene that you draw for this week's homework.
- Link EVERYONE will need to read the following download, The Snowman Story:
- Due by NEXT week:
- INTRODUCE:
- Creating a Graphic Symbol:
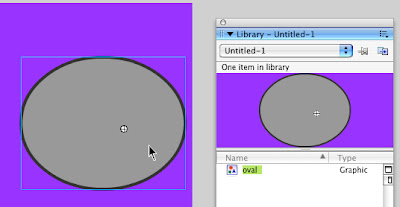
- Draw an object, an oval for example;
- Select the object by double-clicking on it with the arrow tool (V). Make certain that you select both the fill and the stroke.
- Select F8 on your keyboard. This converts the oval into a Graphic Symbol.
- Type a UNIQUE but DESCRIPTIVE name for the symbol. For example, it would not be a good idea to name a triangle that you have drawn the name Maria because you like the name Maria. Something more descriptive of what it is and obvious would be better, such as the name Triangle.
- Select Graphic for behavior and then select Okay.
- Symbols, Symbol Instances, and the Library:
- Once you create a symbol, it then resides in the LIBRARY. To open the library, select the F11 key on your keyboard, or CTRL-L. This will open up the library where you will see a list of all your symbols.
- You can click and drag symbols from the library onto the stage. The advantage to using symbols is that you may use them as many times as you like without having to redraw them each time.
- You may delete your symbols from the Stage (here called a SYMBOL INSTANCE, which is actually just a copy or clone of the symbol), but you should use extreme caution in deleting symbols from the Library (here is where the actual SYMBOL stays).
 *** Keep in mind, if you delete a symbol from the library, it will also be deleted from the stage EVERYWHERE THAT YOU USED IT IN THE MOVIE.***
- Selecting a Graphic Symbol: When selecting a graphic symbol you must only click on it ONE time no matter how many pieces or objects it contains. When selected it will have a blue box around it.
- Arranging Symbols: When you have multiple symbols drawn and created, you may arrange the stacking order of them, putting one above the other or one below another. To alter the stacking order of multiple Symbols you must first select the item you wish to change.
- Select the item with the selection tool (V) by clicking on it once, then;
- Do the following: Modify >> Arrange >> send [backward, to back, forward, or to front]

- Editing Symbols:
- Draw an object, such as an oval or a rectangle;
- Double-click on the object with the selection tool (V) to select it;
- Choose F8 to convert the object into a graphic symbol;
- If you wish to edit this object in any way after it is a symbol, you must choose the selection tool (V), and then double-click on the graphic symbol—this brings you into Symbol-Edit Mode. Once you do so, you may edit, alter, add-to, subtract-from the object(s), or otherwise change it in anyway you wish.
- When you have completed your changes, you must Exit Symbol-Edit Mode—to do this, look in the upper left corner of the stage. You will see the words SCENE 1 and then the SYMBOL's NAME beside it. You must click on Scene 1 to exit the symbol and return to the main movie.

- Breaking-Apart Symbols:
- Choose the selection tool (V);
- Select the symbol on the stage by clicking on it one time;
- Select CTRL-B on the keyboard to break apart the symbol. Once you do this, that particular graphic on the stage will no longer be a symbol Instance; however, the symbol itself still remains in the library.
- Adding Effects to Symbols:
- Choose the selection tool (V);
- Select the symbol on the stage by clicking on it one time;
- Open the properties bar below the stage.
- In the properties bar, click in the center where it says color adn select either brightness, tint, or alpha.
- Experiment with changing the numbers and percentages to see what kind of effect you get.

- Motion-Tween Animation with Symbol Effects: In the following set of steps, you will be creating a circle that will move around the perimeter of the stage using a series of motion tweens. In the second part, you will learn how to add Symbol Effects so that the circle changes its color, brightness, and transparency as it moves around the stage.
LINK Motion Tweens using Symbol Effects (tint).
- Draw a circle using the Oval Tool (O) and convert it into a graphic symbol (see above Creating a Graphic Symbol).
- Once you draw your object and convert it into a symbol, choose the Selection Tool (V) and move the circle to its starting point. We will begin with it placed just OFF-stage to the upper-right corner.
- Next, click in frame 30 in the timeline above, that is just below the number 30, and add a keyframe (F6).
- Then, using the Selection Tool (V), move the circle on the stage to the UPPER-LEFT corner.
- Right-click in the timeline above in the gray area between the keyframes in frames 1 and 30 and select Create Motion Tween from the menu that appears. This will turn the gray area to lavendar, and there will be an arrow there pointing to the right. If this does not occur, or if a dashed line appears instead, you must undo and start over again.
- Then, click in frame 50 and add a keyframe (F6).
- Once again, move the circle, but this time to the LOWER-LEFT corner of the stage.
- Add a motion tween between the two keyframes in frames 30 and 50 above in the timeline.
- Click in frame 75 in the timeline and add a keyframe (F6) on the keyboard.
- Move the circle on the stage to the LOWER-RIGHT corner of the stage.
- Add a motion tween between the two keyframes in frames 50 and 75 above in the timeline.
- Click in frame 95 in the timeline and add a keyframe (F6) on the keyboard.
- Move the circle on the stage to the UPPER-RIGHT corner of the stage.
- Add a motion tween between the two keyframes in frames 75 and 95 and above in the timeline.
- Click in frame 100 in the timeline and add a (final) keyframe (F6) on the keyboard.
- Move the circle just OFFSTAGE of the upper-right corner to the point where we began with the circle.
- Add a final motion tween between the last two keyframes in frames 95 and 100 above in the timeline.
- Select CTRL-ENTER to test the movie.
- If your circle does not travel as you expect, around the perimeter of the stage, there are steps you can take to correct it. First, make sure you only have 6 keyframes in your timeline in frames 1, 30, 50, 75, 95, and 100. If you have any additional keyframes or blank keyframes, you should delete them by first selecting the frame you want to eliminate by clicking on it, then selecting SHIFT-F6.
Finally, you should make sure that the circle is where it should be in each keyframe:
- frame 1—OFFSTAGE to the upper right corner;

- frame 30—in the UPPER LEFT CORNER of the stage;

- frame 50—in the LOWER LEFT CORNER of the stage;

- frame 75—in the LOWER RIGHT CORNER of the stage;

- frame 95—in the UPPER RIGHT CORNER of the stage;

- frame 100—just OFFSTAGE to the upper right corner;

- Finally, make sure that motion tweens go all the way across from frame 1 to frame 100. They should be lavendar with arrows pointing to the right. Dashed lines indicate an error.
- frame 1—OFFSTAGE to the upper right corner;
- If you wish to add Symbol Effects (Brightness/Tint/Alpha), you can only do so in the keyframes. Those are the frames with the dots in the timeline.
- If you wish to add an effect to frame 30, for example, then you must first select frame 30 by clicking in that frame.
- Then you must use the Selection Tool (V) and select the circle ON THE STAGE by clicking on it only ONE time.
- Then you must open the Properties Bar at the bottom and click where it says COLOR near the center of the Properties Bar. A list of properties will appear, Brightness, Tint, and Alpha. Choose one of these and then change the numbers to add an effect.
- You can repeat STEPS 21-23 to add effects to other keyframes in your animation.
- SYMBOLS and the LIBRARY: During the first three weeks of class, you have been introduced to a very important feature of Flash Graphics and Animation, creating Symbols:
- Creating a simple Graphic Symbol:
- Choose your stroke and fill colors.
- Set the thickness and type of your stroke.
- Choose the oval tool (O), hold onto the shift key and draw a circle.
- Choose the selection tool (V), and double-click on the fill of the circle to select both the fill and the stroke.
- Select F8 on the keyboard to convert the circle into a symbol.
- Type a unique name for the symbol, select graphic as the behavior, and then click okay.
- Once completed, a blue box will appear around the new symbol. This indicates that it is no longer an un-grouped object. If you double-click on it, you will be taken into symbol-edit mode. In symbol-edit mode, you will be able to edit your symbol. Once you have completed the edits, you must exit symbol-edit mode before you continue. To do this, click on Scene 1 in the upper-lefthand corner of the window.
- If you select F11 or ctrl-L the Library will open up. To close, you simply select F11 orctrl-Lagain. Once open, you will see a smaller representation of your circle symbol there. If there are more symbols, you will see them all listed there. Here is where your symbols are stored. What is on the stage is known as a symbol instance. It is like a clone, or a copy of what is in the library. Symbol instances may be deleted from the stage without affecting the symbol in the library. However, take great care of your symbols in the library. Do not delete the symbols from the library if you are using them in your movie. If you delete the symbols in the library, they will also be deleted from the entire movie.
- You may use as many symbol instances as you need. All you need to do is drag an instance from the library onto the stage.
- Creating a simple Graphic Symbol:
- More with Motion Tweens

- Hopefully, you can see that the use of symbols, symbol instances, and the library is not limited to circles. To the right is a quick demonstration of a drawing of a fish. This too can be converted into a symbol. But before we get to that, let's make the CIRCLE SYMBOL created in the previous exercise move around the stage:
- If you haven't created a symbol yet, then look at the above exercise to do so: LINK
- Once you have created your symbol, make sure that you have one instance of it on the stage, and only one instance. Click one time on the circle to make sure it is a symbol. If the blue box appears around it when it is selected, then it is probably a symbol. Next, look in your library (ctrl-L) and make certain the circle symbol is there. If so, then you're all set, so move the circle symbol instance just offstage to the upper-right corner.
- Next, in the timeline, click in a new frame, say frame 30, and add a new keyframe (F6).
- Now, on the stage, move the circle across the stage to the upper-left corner.
- In order to make sure that all is correct, let's check the keyframes. Click in frame one. Here, the circle should be just offstage to the upper-right corner. If it is not, then you simply need to move the circle to where it should be.
- Then, click in frame 30 in the timeline. In this frame, the circle should be in the upper-right corner of the stage. Likewise here, if the circle is not where it should be on the stage, you simply need to move it where it belongs.
- Finally, place the mouse over the timeline, in between the two keyframes over the grey area somewhere in the middle, and right-click.
- A menu should appear, so choose Create Motion Tween. LINK
- Gradients
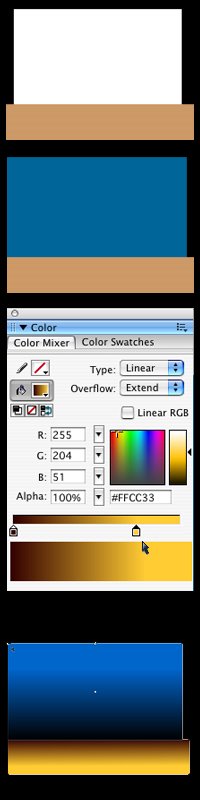
- Now let's apply some color to our background using linear gradients. A gradient is a gradual change from one color to another. First, using the rectangle tool (R), draw a rectangle for the ground. It is all right whatever color you choose for now, because we will change it with the gradients. Also, the rectangle should hang over the edges of the stage some. Don't try to draw exactly to the edge of the stage.
- After you draw the first rectangle, draw a second one for the remander of the background. The color for this one will also be altered by the gradients.
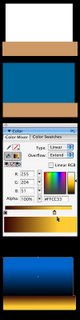
- Next, open the color mixer panel.
- Notice in the panel where it says solid. Click there and select linear, and then next notice the horizontal line below that appears. It represents the gradient, and by default goes from black to white.
- The gradient colors can be changed by manipulating the square boxes below the horizontal line. To change the color of one of them, simply double-clip on it and the color selection panel appears.
- Choose a color that you like, and the gradient is altered. If you double-click on the other box, you can select its color also.
- Use the paint bucket tool (K) to fill the bottom rectangle with the gradient, and the fill transform tool (F) to rotate it so that it goes from light to dark from bottom to top.
- Repeat the previous 4 steps for the top rectangle.
- This will be the background of your animation, so name the first layer backgound and lock it.
- Add a new layer and name it fish.
- Place the fish graphic symbol that you created in this layer.
- Moving the Fish:
- On the stage, move the fish symbol to the middle of the right side of the stage.
- In the timeline, click in frame 20 and add a keyframe (F6).
- On the stage, move the fish to the center of the stage.
- n the timeline again, click in frame 40 and add another keyframe (F6).
- On the stage again, move the fish to the left-hand side of the stage.
- Now, place the arrow between frames 1 and 20, right-click, and select Create Motion Tween.
- Finally, place the arrow between frames 20 and 40, right-click, and select Create Motion Tween again.
- The final fish animation is here: LINK
- To add the easing click here: LINK
- Symbol Effects
- As you should already know, if you edit a symbol (using symbol-edit mode), then all instances of it will be edited to look exactly the same; however, you may change various properties of a symbol instance using the properties bar.
- Go to the previous movie with the circle, choose the selection tool (V), and click one time on the circle on the stage to select it.
- Open the properties bar, look in the center where it says color, click and select tint.
- Select a tint color and a percentage. This will change alter the color of your symbol, the fish.
- Now click in frame 30.
- Select the circle in the center of the stage by clicking on it one time.
- Open the properties bar again, and alter the tint color again. Click here to see the results: LINK

- Motion Tween Easing
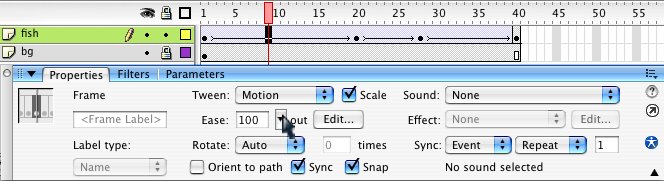
- Motion Tween Easing is a tool that is used to alter the speed of an object through a motion tween. As in the fish animation above (and here), the fish slows down toward the middle, and then speeds off again, as if swimming against the rhythmic current of the ocean waves.
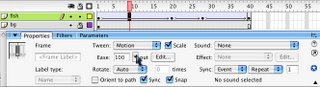
- Returning to the fish lesson, click in the middle of the first tween in the timeline, that is between frame 1 and frame 20 in the lavendar area.
- Next, open up the properties bar, locate the ease setting, click there, and select 100. This will cause the fish to slow down at the end of the tween.
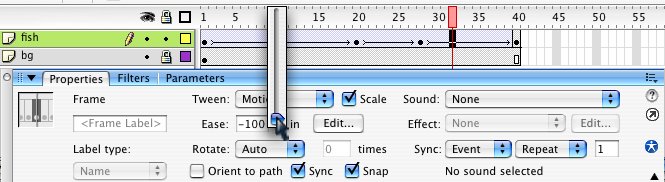
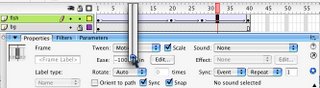
- Then, click in the second tween between frame 20 and frame 40, look in the properties bar again, and set the ease to -100. This will cause the tween to start slow and speed up toward the end of the tween.
- Scaling Objects & Motion Tweens
- You should already be familiar with how to scale objects up and down (making them larger and smaller) using the free-transform tool (Q). However, you may not know that this can be combined with the motion tween to cause an effect which makes an object like it's changing size over the course of a motion tween.
- Let us return to the circle motion tween that was discussed earlier. Click here to see it: LINK
- Click here to see the instructions to create it: LINK
- To add a scaling effect to this little animation, first click in frame 1. This automatically selects the circle on the stage.
- Then select the free-transform tool (Q) and change the size or shape of the circle with it.
- Next, click in last frame. This automatically selects the circle on the stage again.
- And again, using the free-transform tool (Q), and change the size or shape of the circle with it. The circle will now gradually change shape and/or size through the course of the animation.
- View the final circle animation. Click here to see it: LINK
- Bouncing Ball
- Choose the selection tool (V), open the properties bar, and set the background color.
- Choose the oval tool (O), turn OFF the stroke color, and select black as the new color for the fill.
- Hold down on the shift key and draw a perfect circle on the stage.
- Then, choose the selection tool (V) and select the circle you have drawn on the stage.
- Copy (ctrl-C) the circle.
- And then, paste-in-place (ctrl-shift-V) the circle.


- Choose a new fill color for the pasted circle.
- Choose the free-transform tool (Q), make the circle smaller to reveal the original copied black circle, and then using the arrow keys on the keyboard, move the now smaller colored circle toward the center and closer to the top edge.
- Choose the line tool (N) and draw two connected lines that form a sort of rooftop shape.
- Choose the selection tool (V) and push on the line-segments one at a time to form curves to form a single curve like the one you see in the second image below here.
- Using the line tool (N), draw another line-segment connecting the two endpoints of the curve; and then, with the selection tool (V), turn this line into a curve as well.
- Choose the paint-bucket tool (K).
- Select a lighter value of the color of your ball (in my case, since my ball is blue, I will choose a lighter blue) as your fill color.
- Fill up this crescent shape by clicking in it one time.
- Then, choose the selection tool (V) and select the stroke of this new little shape.


- Delete the stroke and then move the crescent shape into place on the top part of the circle. This is the light reflecting off the spherical shape.
- Now, select the entire ball, conver to symbol (F8), give it the name of ball, select graphic for type, and click okay.
- Name the first layer ball.
- Lock this layer and add a 2nd layer.
- Name the new layer ground.
- Then move the ground layer so that it is below the ball layer.


- Choose the rectangle tool (R).
- Select a new color for the fill.
- Turn off the stroke color so that you see the red slash in the box instead of a color.
- Click in frame 1 of the ground layer.
- On the stage, draw a rectangle that covers over approximately the lower third of the stage. Make certain that the edges of the rectangle hang over the edges of the stage on both sides as well as the bottom.


- Move the ball so that it sits right above the stage.
- Now click in frame 20 of the ball layer.
- Add a keyframe (F6).
- Then, click in frame 20 of the ground layer and extend its duration (F5).


- Click in frame 10 of the ball layer.
- Add a keyframe (F6).
- Move the ball so that it looks as if it is sitting on the ground. See my example to get an idea.
- Then, click in frame 12 and add another keyframe (F6).


- Right-click between frames 1 & 10 and select create motion tween. Then, repeat this between frames 12 & 21.
- Click somewhere between frames 1 and 10 in the ball layer.
- open the properties bar.
- Locate where it says ease and set it to -100
- Then, click in between frames 12 and 21.
- Alter the easing here so that it reads 100.


- Click in frame 11 and add a keyframe (F6).
- Select the ball on the stage and choose the free-transform tool (Q).
- Move the center point, that is the little white circle, so that it is on the bottom.


- Flatten the circle a little, but also stretch it out from side to side.
- Add a new layer named shadow, and move it below the ball layer.
- Unlock the ball layer.
- Click in frame 10 of the ball layer.
- Copy (ctrl-C).
- Click in frame 1 of the shadow layer.
- Paste-in-place (ctrl-shift-V).


- Select the ball on the stage by clicking on it one time with the selection tool (V).
- Open the properties bar.
- Click where it says color and select tint.
- Choose a dark shade of the color of your ball. In my case, since my ball is blue, I've chosen a very dark blue.
- Change the percentage to 100%.
- Choose the free-transform tool (Q).


- Move the center point (the little white circle) so that it is on the bottom, and then flatten your circle.
- Click in frame 10 of the shadow layer and add a keyframe (F6); then, click in frames 11 & 12 and add keyframes to those as well.
- Click in frame 1 of the shadow layer.
- Select the free-transform tool (Q).
- Make the flattened circle a quite a bit wider and a little bit taller.
- Then, open up the properties bar.
- Click where it says color and choose advanced.
- Click on the settings button.
- Change the alpha setting on the bottom left of the window that opens up so that it is 15%.
- Choose the selection tool (V) and select the now lighter oval on the stage by clicking on it one time.
- Copy (ctrl-C).


- Click in frame 21 of hte shadow layer, add a blank keyframe (F7), and paste-in-place (ctrl-shift-V).
- Add motion tweens between frames 1 & 10 and frames 12 & 21 of the shadow layer.
- Click in frame 11 of hte shadow layer, choose the free-transform tool (Q), and make the shadow as wide as the ball.