1. week 1
  2. week 2
  3. week 3
  4. week 4
  5. week 5
  6. week 6
  7. week 7
  8. week 8
  9. week 9
  10. week 10
  11. week 11
  12. week 12
  13. week 13

Aniboom: Latest hits

Friday, October 30, 2009

Fall 09 week 7:
10/27/09: Tue, 12:25 - 3:25

Hi Everybody,
As mentioned in class, please attempt to do the push-in motion as instructed below in this week's blog.

Have a nice weekned.
Carter-

  1. TOPICS:
    1. LINK   —Pushing-in to a medium shot of the cat

  2. HOMEWORK—DUE NEXT WEEK:Follow along with the steps below to attempt to add the PUSH-IN to your animation.

  3. STORYBOARD: below you will find links to each of the pages of the storyboard containing 3-frames each. You should complete up to frame 8 for the MIDTERM.
    • LINK   Frames 1-3
    • LINK   Frames 4-6
    • LINK   Frames 7-9
    • LINK   Frames 10-12
    • LINK   Frames 13-15
    • LINK   Frames 16-18
    • LINK   Frames 19-21
    • LINK   Frames 22-24
    • LINK   Frames 25-27
    • LINK   Frames 28-30
    • LINK   Frames 31-33—not yet complete.
     
  4. INTRODUCE:
    1. Pushing-in to a shot:
    2. If at any point the animation seems too short or too long, then undo and redo it. You will have to adjust the number of frames, add more frames to make it slower, and remove frames if it needs to be faster. More than likely, below, the animation is much too fast which means EVERYONE WHO FOLLOWS THE INSTRUCTIONS BELOW SHOULD LOOK AT THE ANIMATION AND ADJUST THE NUMBER OF FRAMES UNTIL IT LOOKS RIGHT.

      1. Now that we have reached the cat, according to our storyboard we must push-in, or, in other words , get closer to the cat. To push-in simply means to push the camera closer to the object of interest. In this case, it is the cat. We have already passed all of the characters and we have already seen the landscape, or setting, of our story. When we reach the cat, we will truly begin telling the story.

        The sequence of movements we are completing now, the pan and push-in, is known as the establishing sequence. It is called this because it establishes, or sets up the beginning of the animation, and tells us all of the most important information about the setting and the main characters. In the nursery rhyme, Hey, Diddle, Diddle!, our script, and our storyboard, the beginning starts with the cat. Therefore, when we reach the cat, we will begin telling our story.

        Now that we have reached the cat, we can begin telling our story, so we push-in, or, we get a little closer so as to get a better look, to pay closer attention to what we will see. This is what the "camera" does for us when it gets closer.

      2. We will start in the frame wherever you left off. In my case, I am at frame 360. But let us first analyze the scene: if we look at the stage, we see that all that is left there are the cat, the fence, the house, the ground, the moon, the stars, and the shadow from the fence. The cow, the dog, the tree, etc, all have already passed across the stage and left the area. They are no longer part of the current shot. That is limited to the cat and the house behind, for the most part. As a result, when we push-in to the cat, we do not need to deal with those things that are off-stage, only what is on-stage.

        We will first lock and hide those layers we do not currently need: tree_near, dog, cow, shadow, and tree_far. Furthermore, since we will not be making the moon and stars larger, we will also lock those layers.

      3. Next, we want to scroll over to determine where we want the next keyframe to be. We'll give the viewer a brief pause before we actually begin the push-in action of the camera, just as we did between the panning motions. That means we'll put a keyframe to mark the start of the panning motion, and I'll say let's give ourselves about 15 more framesfor this pause. Keep in mind, however, that we ONLY need to select those layers which are NOT hidden or locked. To do this, since we have to skip over some layers, instead of holding down on the shift, you must hold down on the CONTROL (the COMMAND key for the MAC) while you click:


      4. Now, to complete the next camera action, the push-in, we need to mark the END of this motion, as we have already marked its beginning (frame 375). So, we need new keyframes in these same layers in frame 500.


        Click in frame 500 in the top layer we are working with, the cat layer, and hold onto the control (or command)add click on those same layers, the fence, shadow, house, and ground layers, and add a keyframe (F6).

        ONCE YOU DO THIS, MAKE CERTAIN THAT YOU DO NOT DESELECT!!


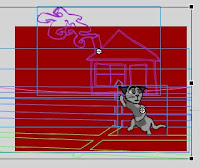
      5. You should notice that all the object, the cat, ground, etc., are still selected and have blue boxes around them; however, if you did deselect, you should try to undo until all the objects are once again selected. If this does not work, the REDO THE PREVIOUS STEP.


      6. Now, turn on the outlines for all the layers except the cat layer. To do this, you have to look where the layers are, and right beside the lock in the top left, you will see a black box. If you click on this, it will put all layers in outline mode. To do this, click on the colored box in the cat layer itself.

        This will allow us to see everything, but also see through them. You might ask why we would need to see through the objects: we not only need to see all the different objects we've drawn such as the house, the cat, the ground, etc., but also the stage itself.

        It will help us when we make everything larger. We need to be able to see the size of the stage because once we make everything larger, much, much larger, if we didn't turn on the outlines, everything would be so large we wouldn't be able to see the stage at all, and so we wouldn't be able to judge how large everything was.

      7. Then select the free transform tool (Q), hold down on the shift key, and grab one of the corners and make the selection much larger.

      8. If you are not sure about the size, whether it is big enough or whether it is too big, then move move EVERYTHING at once not just the cat so that it is on top of the stage. Make certain that the cat is almost the same height as the stage. If it is still not big enough, then repeat the above action: hold on the shift key and grab the corner to make it even larger.

      9. When it is the correct size, make sure the cat is on the stage and that you can see its entire body within the confines of the stage. Once again, you must be careful when you move the cat that you move EVERYTHING TOGETHER and not just the cat.

      10. Extend the duration (F5) of the stars and moon layers to the last frame.

      11. So that the viewer can see the cat at this point, enlarged like this to what we call a medium shot for a moment, we must increase the number of frames. If we look at the timeline right now, we see that the motion tweens end at frame 500, and that's it. Everything is this large for only that one frame. In order for it to last longer we should extend the duration for a few frames, say 40 or 50 more frames, out to frame 550.

        To do this, click in frame 550 of the cat layer, hold onto the shift, click in the other layers (cat, fence, shadow, house, ground) and select F5.

Friday, October 23, 2009

Fall 09 week 6:
10/20/09: Tue, 12:25 - 3:25

Hi Everybody,
It seems that most of you really got, with a few difficulties, what I assigned for you to try for last week's homework, and then what we were doing in class this week.

Some of you are having lots of problems, but the reason for that is obvious: you aren't doing any work. Heck, you're probably not even reading this, so sometimes I wonder why I spend so much time working on my blog: I create this blog primarily for YOU, you the ones who have the most problems, but you are precisely the ones who are NOT taking advantage of it. What else can I do to get you guys to be a little exciting and passionate about SOMETHING!?!? Isn't that what life is about? Find something you love and then go for it 100%?

Take a cue from those few who ARE excited, talk to them, become friends with them, sit next to them, and let a little of that rub off on you. You'll be thankful in the end.

This week is basically a repeat of last week: just do the homework that was due last week (what we did in class this week) and you will have most of what is due for the MIDTERM PROJECT next week.

GOOD LUCK!!!
Carter-

  1. TOPICS:
    1. Review: Symbols
      1. LINK   —Symbol Types
      2. LINK   —MovieClip Symbols: Creating a shining star
      3. LINK   —Nesting a symbol inside another symbol
      4. LINK   —Animating inside a MovieClip symbol

    2. Review: Fading into the night sky
      1. LINK   —Creating a night sky
      2. LINK   —Layer Stacking Order
      3. LINK   —Fading into the sky
      4. LINK   —Fading out of the sky
      5. LINK   —Fading in and out of the title

    3. Review: Character Symbols II
      1. LINK   —Creating a character as a graphic symbol
      2. LINK   —Creating complex character symbols
      3. LINK   —Nesting character parts inside a movieclip symbol

    4. Review: Panning motions
      1. LINK   —Stacking order of the layers
      2. LINK   —Panning Motion I: pan down from sky to ground
      3. LINK   —Panning Motion II: pan right from dog to cat

  2. MIDTERM PROJECT—DUE NEXT WEEK:Following this week's demonstration, you should continue work on your animation and complete the following for the midterm project next week:
    1. Fade-in at the beginning of the animation,
    2. The fade-in of the title, and
    3. The fade-out of the title.
    4. Create several different shining star movieclips and create a night-sky background. Each star movieclip does not have to have 10 frames, or 20 frames inside. They can have any number of frames so that they shine at different rates.
    5. Create your 3 main characters (the dog, cow, and cat) they way instructed below.
    6. Draw your landscape, whether it be the country or the city, or a town, or outerspace, convert each element into a symbol and put it on its own layer.
    7. Complete the panning motions as introduced in last week's homework, as reviewed below, and as covered in class this week.
    8. ***EXTRA CREDIT***Make an attempt at completing the PUSH-IN camera motion into the cat (see frame 9 of the storyboard and the explanation below).


    9. Well, MIDTERM IS HERE, and most of you have A LOT OF WORK TO DO!!! So put yourselves in high gear and churn it out. Now is not the time to dawdle on details. Get the symbols made and the animation done. Afterwards, if you have any extra time, you can work on the details and make your drawings perfect.

      The midterm is the second most important grade of the term. It will be more difficult to pass the class if you fail the midterm, so I hope you all work hard this week and get it done.

  3. STORYBOARD: below you will find links to each of the pages of the storyboard containing 3-frames each. You should complete up to frame 8 for the MIDTERM.
    • LINK   Frames 1-3
    • LINK   Frames 4-6
    • LINK   Frames 7-9
    • LINK   Frames 10-12
    • LINK   Frames 13-15
    • LINK   Frames 16-18
    • LINK   Frames 19-21
    • LINK   Frames 22-24
    • LINK   Frames 25-27
    • LINK   Frames 28-30
    • LINK   Frames 31-33—not yet complete.
     
  4. REVIEW—SYMBOLS:
  5. There are three (3) different kinds of symbol types in Flash, but so far we have learned only about one kind, Graphic Symbols. Movieclips are the new type that are introduced down below. This will be difficult and confusing to many, but simply do your best. We will cover it thoroughly in class.

    We have used graphic symbols to enable us to create motion tweens and to create re-usable graphics, graphics that may be used many times; however, there are many more uses for symbols, including creating re-usable animation WITHIN Movie-Clip symbols.

    1. Defining Movie-Clip and Graphic Symbols:
    2. The main distinction between these two types of symbols is that one is a dynamic symbol, and one is primarily a static symbol. In other words, one involves activity (animation) and interactivity, and the other involves in-activity or the lack of activity or interactivity, just simple motionless graphics. When a web graphic or object is dynamic, such as a movie-clip, it usually involves animation or user interactivity of some kind. Static graphics, on the other hand, are NOT usually active and NEVER interactive. They are static, still, non-moving, inactive.

    3. Graphic Symbols:
    4. Graphic symbols are the most basic symbol types, but they possess all of the fundamental properties of symbols: they are reusable graphics, in which multiple instances of the symbol may be used without drawing more, and without adding filesize to your movie; they allow you to create motion tween animations, and they reside in the library (ctrl-L || F11). All types of symbols have these three fundamental properties, but a graphic symbol is probably the type that is used most often. As its name suggests, it is for graphics, any ordinary drawing or object that you would create in Flash. Some graphic symbols do contain animation within them; however, the vast majority will not.

    5. Movie-Clip Symbols:
    6. Next to graphic symbols, Movie-Clips are the most widely used type of symbol; and, in fact, for web-sites or interactive movies, they are perhaps even more widely used than graphic symbols. This type of symbol, being dynamic, often contains animation within it. Unlike simple graphic symbols, which usually contain a simple drawing of some type, movie-clips may contain within themselves entire animations. More often, however, they contain snippets of animation, brief animated sequences. Furthermore, one of the properties of movie-clips is that they may be allowed to play endlessly in a loop. As a result, those brief snippets of animation are played over and over and over again, such as an eye blinking, a raindrop falling, or a bird's wings flapping. If the sequence requires repetitive movement of some kind, then it is ideal for being placed in a movie-clip symbol. A character’s blinking eyes are a great example of this sort of animation.

     
  6. Creating a Movie-Clip Symbol—a shining star (star_mc):
  7. Next, we will create our own movie-clip symbol. Doing this is like creating the simple graphic symbols that we have made up to now. We will start first with a drawing.

    1. Starting with the Graphic Symbol:
      1. Draw:
      2. Using the polygon tool (R—press down on the tool until the polygon shows itself, then click on options in the toolbar to select STAR) to draw a star. It may be any type of star you like, 5 or 6 points, fat or skinny.

      3. Stroke:
      4. Once drawn, select the selection tool (V), and select only the stroke, the outline of the star.

      5. Delete:
      6. Now hit delete.

      7. Select:
      8. Make sure the selection tool (V) is still activated, and then select the star on the stage.

      9. Convert:
      10. Choose convert to symbol (F8), select graphic for type and then click okay.

       
    2. Nesting Symbols:
    3. The star symbol is now a graphic symbol; although, it is not yet animated. In order to do this we must NEST it within another symbol and then we can create the animation inside of the symbol with symbol-edit mode.

      1. Graphic:
      2. Your star is now an ordinary graphic symbol; however, we want the symbol that we eventually create to contain animation within the symbol itself. Now why, you might ask, would we want that? Well, the reason is so that the animation can be resusable. What does that mean, you might wonder? Presumably, you will want more than one star in your sky, and you would also want those stars to shine over and over again repeatedly and not just one time, the end, that’s it. So that you do not have to make the shining animation for each star (and if you have lots of stars this could be very many indeed), you just put the animation in a symbol. Once you do that, all you have to do is drag a star from the library and it will automatically be animated. In addition, it will play its animation in an endless loop. This is very convenient and economical.

      3. Check:
      4. Therefore, we must put this new graphic symbol of the star INSIDE another symbol. When you put a symbol inside of another, this is called nesting, and it is really a very simple thing to do. First, you have to make sure you are not already inside the graphic symbol. Look in the upper left corner and next to where it says Scene 1, make sure you do not see the name of any symbol. If you do, click on the words Scene 1 and you will EXIT SYMBOL-EDIT MODE from whatever symbol you are in.

      5. Convert:
      6. Now, using the selection tool (V), click on the symbol of the star once on the stage to select it, and convert it to a symbol (F8).

      7. Movieclip:
      8. Give it the name star_mc, select movieclip for type, and then select okay.

      9. Nest:
      10. Once done, it should have a blue box around it just like a graphic symbol does when it is selected, and inside of this symbol is the graphic symbol.

       
    4. Animating Symbols:
    5. The star symbol is now a movie-clip symbol; however, it is not yet animated. We must create the animation inside of the symbol with symbol-edit mode. Now that we have our symbols nested, a graphic symbol inside of a movie-clip symbol, we can go about creating our animated movie-clip.

      1. Edit mode:
      2. Select the selection tool (V) & double-click on the star on the stage to go into symbol-edit mode for the movie-clip.

      3. layer 1:
      4. Once inside the movie-clip symbol, name the first layer star, and add a second layer.

      5. layer 2:
      6. Name the second layer shine and lock it

      7. copy:
      8. Click in frame 1 of the star layer & copy (ctrl-C).

      9. lock:
      10. Lock the star layer & unlock the shine layer.

      11. paste:
      12. Click in frame 1 of the shine layer and paste (ctrl-V).

      13. extend the duration:
      14. Now, click in frame 10 of the shine layer and extend the duration (F5).

      15. motion tween: Now right-click in the timeline within the gray area (known as in-between frames0, and add a motion tween.

      16. transform:
      17. Do NOT move your playhead (the red thing in the numberline with the red line that goes down below it over the frames), but select the free transform tool (Q). Then, hold onto the shift key, grab the corner of the star, and make it larger.

      18. select:
      19. After that, choose the selection tool (V) and select the star on the stage by clicking on it one time.

      20. alpha:
      21. Then open the properties bar, click where it says color, and set the alpha to zero.

      22. stacking order:
      23. Also in the timeline, make sure that the shine layer is below the star layer.

      24. duration:
      25. Next, click in frame 10 of the star layer and extend the duration (F5) here as well.

      26. exit:
      27. Finally, exit symbol-edit mode by clicking on Scene 1 in the upper left-hand corner.

      28. view:
      29. Save (ctrl-S) and test (ctrl-enter) the movie, you will see your star shining over and over in an endless loop.

     
  8. REVIEW—NIGHT SKY:

    In next week's class we are going to create the very beginning of the animation that we will work on for the remainder of the term. We will do the first three frames from the storyboard above and here (LINKFrames 1-3). The idea is to read the text next to each drawing in the storyboard to find out what happens, and then to look at the picture to see what the viewer should see.

    As you should read, the first thing it says is FADE IN; but we also have to know what to fade-in TO. All we have to do to find out the answer to this question is to look at the picture to the right, and we see that it is a night sky. It also describes what we see in the text to the left. Before we get to the actual fade-in, however, we must draw and create the scene.

    In the following steps, I assume that you have already drawn your scene, and so will not go through steps of how to create the shining stars. If you need to know how to do this, you should see above how to create a shining star.


    1. Layer Stacking Order:
    2. what you see above is the final result. In order to get there we must first put all the necessary symbols on the stage in their correct layer. Then we must put the layers in their correct order so that the correct one is on top of the others.

      1. Name the first layer stars.
      2. Open the library (F11), and drag the star movie-clips into this first layer.
      3. Once you have placed enough stars on the stage to your liking, lock, the first layer and add a new layer.
      4. Name the second layer title.
      5. Drag the title symbol into the second layer.
      6. Lock the title layer.
      7. Add a new layer and name it fade.
      8. Choose the rectangle tool (R) and draw a black rectangle that covers over the entire stage.
      9. Choose the selection tool (V) and select the black rectangle by double-clicking on it.
      10. Convert to Symbol (F8), name it fade, and choose graphic for type. The image shows the way your layers should now look.
       
    3. Fade-In:
    4. what you see here are the way the layers should be stacked and how that should make the stage look. Now we must start the animation.

      1. Click in frame 80 of the fade layer and extend the duration (f5).
      2. Then, click in frame 20, Select the rectangle on the stage by clicking one time on it.
      3. Open the properties bar and change the alpha to 0%. When you do this, notice that a little dot (a keyframe) automatically gets added where you have clicked, where the playhead is.
      4. Right-click between frames 1 and 20 select create motion tween. This creates the fade in.
      5. Now, click in frame 80 of the title layer and extend the duration (F5). Repeat this step for the stars layer also.
       
    5. Fade-Out:
    6. Now that we have the Fade-In portion of the animation, let's set up the Fade-Out part.

      1. Next, right-click in frame 70 of the fade layer to begin the fade-out sequence and select INSERT KEYFRAME >> COLOR .
      2. Then, click in frame 80 of the fade layer, right-click and select INSERT KEYFRAME >> COLOR again.
      3. In frame 80, select the rectangle on the stage by clicking one time on it.
      4. Again, open the properties bar and this time change the alpha to 100%.
      5. As before, make certain that you have extended the duration (F5) of the other two layers out to frame 80.
      6. Lock and Hide the fade layer.
       
    7. Title Fade-In/Fade-Out:
    8. At this point, we have the opening and closing of this very first scene: the fade-in/fade-out sequence; however, we do not have the title fading in yet. If you read FRAME 2 of the storyboard, you will see that the title fades-in over the stars, and then fades away again. This is our next step.

      1. Since the title doesn't begin to fade-in until after the stars and sky have already faded-in, we won't begin the title fade-in until frame 20. That will be where the fade-in begins. Therefore, since the motion tween begins there, click in frame 1 of the title layer and then release. You must then click AGAIN, hold down, and drag to frame 20. Notice that when you do this, the area before frame 20 turns white. This means that it is blank. This makes sense because we have moved the keyframe past this area to frame 20. So let's think about this: since the title doesn't even begin to fade-in until frame 20, it does not even need to be there at all until then. As it was before, however, it was inframe 1. We did not need it there. Therefore, we clicked in frame 1 of the title layer and moved it to frame 20 where it will begin the fade-in of the title.
      2. Good, now the title doesn't even arrive into the animation until frame 20. Furthermore, it should only gradually become visible starting here, in frame 20. That means that in this frame, frame 20, we must changle the opacity of the title. To do this, choose the selection tool (V) and select the title on the stage.
      3. Next, open the properties bar and change the alpha to 0% to make the title invisible.
      4. Now, right-click and select add motion tween.
      5. After about 20 more frames, the title should be fully visible, so right-click in frame 40 and INSERT KEYFRAME >> COLOR (if color is not available to click on, then choose ALL).
      6. By this frame, frame 40, the title should be fully visible; however, as you can see, it is still invisible. Therefore, with the selection tool (V), click on the little circle in the middle of the invisible title symbol on the stage to select the title.
      7. Then, open the properties bar and change the alpha to 100%. This will complete the fade-in of the title. Next then is the fade-out portion.
      8. We must allow some time for the viewer to read the title and let it sink in, about 20 more frames. Only after that point in the timeline does the timeline begin to fade away again. That means that the fade-out begins in frame 60 of the timeline—so right-click in that frame and select INSERT KEYFRAME >> COLOR (if color is not available to click on, then choose ALL).
      9. The fade-out of the title will go a little faster than the fade-in, so it will take fewer frames, only about 10. So, right-click in frame 70 of the title layer and select INSERT KEYFRAME >> COLOR (if color is not available to click on, then choose ALL).
      10. By this time, however, the title will have completely disappeared again, which means we must reduce its opacity. Using the selection tool (V) click on the title on the stage in frame 70 to select it. Then open the propterties bar and reduce the alpha to 0%. This should conclude the fading-out of the title.
        Below you will see the timeline as it appears at the end of these steps:
     
  9. INTRODUCE—CHARACTER SYMBOLS II:
    1. Graphic Symbols—making the entire drawing one single symbol:
      1. Following last week's blog posting regarding the dog symbol, here I am goind to show you also how you might create your cow symbols. After you have drawn your cow character, select the entire drawing (if there is nothing else on the stage, click in frame 1 of the layer to this).

      2. Click on F8 to Convert to Symbol.

      3. Give it a unique name (name it cow), select graphic for behavior, and then click okay.

       
    2. Complex Symbols—creating nested symbols: symbols within symbols, that is what we will begin working on in this section.
    3. 1.

      Sometimes it is necessary to create complex symbols. In the following situation, we will make the head, the body, the legs, and the arms into separate symbols. First, we must break apart the graphic symbol that we have already created. To do this, select the cow symbol by clicking on it one time.

       
      2.

      Next, break the symbol apart by selecting ctrl-B. At this point, the drawing of the cow on the stage is no longer a symbol instance; however, if you look into the library, you will see that you still have the symbol there.

       
      3.

      Now, select only the head of the cow. To do this you must use the arrow tool, and zoom up very close. Make certain you get all of the pieces of the cow’s head in the selection. It is very important that you do not leave any piece of the head out of your selection.

       
      4.

      Next, once you select the head, choose the arrow tool (V) and move the head away from the body.

       
      5.

      If you find that there are pieces of the head left out, little fragments of lines or color, then undo until the head goes back into place, and try selecting again.

       
      6.

      Once you select the head and move it away from the rest of the cow’s body, then convert it into a symbol (F8).

       
      7.

      Give it the name cow_Head, select graphic for behavior, and then click okay.

       
      8.

      Now, look at the cow’s body. You should notice that there are little gaps in the body where the head used to be. Fill in these gaps and round them out.

       
      9.

      Once done, let us try and select one of the arms of the cow; however, you will probably soon see that in such a case, when you click on the black area, it selects the black on the arm, as well as all the black on the body. So, we'll have to separate the arm from the body by drawing a single line. We can do this with a colored line so that we can see it stand out from the rest of the drawing. We will also know that we have to later delete the line. We can do so with both arms right now.

       
      10.

      Now, double-click on one of the arms and move it away from the body. Then, do the same thing to the other arm.

       
      11.

      Remember to delete those lines that you drew to separate the arms from the body.

       
      12.

      Then, select one arm at a time and convert them to graphic symbols. Name them cow_arm1 and cow_arm2.

       
      13.

      We need to do the same thing for the legs, although with this particular cow, they will be a bit easier than the arms. Therefore, simply select each leg, one at a time, move them away from the body, and convert them into symbols named cow_leg1 and cow_leg2. Don't forget to round out the tops of the legs, and to remove the strokes there.

       
      14.

      Before we convert the body into a symbol, you may have noticed that there are gaps missing from the body, chunks cut out where the arms used to be. We must fill these two areas in before we convert the body into a symbol. To do this, we must use the line tool again to close off the spaces, and then the paint bucket to fill them in.

       
      15.

      Finally, select the body, and convert it to symbol (F8). Give it the name cow_body, select graphic for type, and then click okay.

       
      16.

      Now that we have at least five graphic symbols, you may try to put them all back into place, as in a puzzle. You will find that the head is below the body, partially hidden by the body. To correct this, select the head by clicking on it one time.

       
      17.

      Next, go to Modify >> Arrange >> Bring to Front. This will put it above the body. Repeat this for the arms so that they are also above the body.


    4. Movie-Clip Symbols—combining all the individual graphic symbols into one single movie-clip symbol:
      1. Once the cow is reassembled and looks like it did originally, we will put it together into a single symbol. As it is now, it is composed of six parts: the head and the body, the two arms, and the two legs; but we want to envelope all of these parts together in a single symbol. To start, we must select all the symbol instances, each of the body parts together.
      2. They must all be selected in order for this to work, so make certain you see blue boxes around them all. If so, then click on F8, convert to symbol.
      3. Give this new symbol the name of cow_mc, select Movie Clip for type, and then click okay.
     
  10. INTRODUCE—'CAMERA' PANNING MOTIONS:
    1. Layers—Stacking Order;
    2. 1.

      For our beginning in this entry, we'll start where we left off with our posting last week when we faded into the movie and the title—see above fade-in/fade-out. Let's first observe, however, what the layer stacking order is:

      1. fade
      2. title
      3. tree_near
      4. dog
      5. cat
      6. fence
      7. cow
      8. ground
      9. moon
      10. stars
       
       
      2.

      Symbols—As you can see from the example above, that we have already completed the very beginning of our animation in which the sky fades in, followed by the title. If we compare this little animation so far to our storyboard, we will soon see that we have completed the first three frames at this point (frames 1-3); however, our goal now is to complete a few more frames from the storyboard, namely the ones that include the panning motions. There are two of these camera movements, pan down from the sky to the ground, and pan right from the dog to the cat. Since our 'camera' is stationary, since we cannot move our imaginary camera, we have to figure something else out.

      If we think of our camera as the stage (everything must pass across the stage in order to be in the shot), then we realize that instead of moving the camera, aka the stage, across everything, then we must instead move everything else across the stage, aka the camera.

      To pan down, to move from above the ground, down to the ground, we must put everything, the entire landscape, below the stage.

      Therefore, since we have to make everything move, everything must then be a SYMBOL


      The stage is the smaller grey rectangle in the upper left. Notice how everything in the scene is placed below the it. Also, notice how the elements that set the scene, the tree, the ground, fence, etc., together all are more than 2 times as wide as the stage. This is so as to allow for the pan right movement as well. As mentioned, I created a landscape that is approximately 2.5 times the width of the stage.

       
      3.  

      Pan Down—Starting at the point where the title fades out, frame 90 according to our last class demonstration (but it could be any frame depending on your individual animation) we will begin the panning motion.

      The title fades out by frame 90, so we will begin the pan down after this, say at frame 100. Therefore, we will need to move all our objects in all the layers that contain elements from the scene to this frame: tree_near, dog, cow, cat, fence, shadows (if you have any), tree_far, ground, moon, and stars. The movement begins in frame 100, so the easiest way to move the objects there in each layer is to first select frame 1 in the tree_near layer. We do not need to concern ourselves with the fade or title layers because they will not be panning down.

       
      4.

      Then, hold down on the shift key and click in frame 1 in the bottom layer (this should be the stars layer.


      This should select frame 1 in all the layers that have objects in the landscape.

       
      5.

      Once selected, then release. Now click again on the selected frames in frame one and HOLD DOWN, but do NOT DESELECT. Instead, drag these frames to frame 100 where we will need to begin the panning motion. Be careful not to drag the frames up or down a layer. If you make a mistake, simply undo (ctrl-Z) and try again. This point, frame 100, is the beginning point of the pan down motion.


      6.

      Now, we need to extend the duration to mark the end of the pan down motion. We'll give the movement about 150 frames, which would put us in frame 250. So, click in frame 250 in the tree_near layer, hold down on the shift key, and click in frame 250 of the bottom layer, the stars layer. This should select frame 250 in all the layers. Then extend the duration (F5). Right-click over the highlighted area IN FRAME 250, and add a motion tween.


      ***Careful NOT to deselect anything at this point.***

       
      7.

      When you zoom out (do not deselect), you should see that everything below is still selected with the blue boxes around each object. This is what we want. It will help us move everything together. Please, do NOT use the selection tool. Instead, to do this, hold down on the shift key (to help us move things faster) while you click on the up arrow key on the keyboard. Do so until the ground and all is on top of the stage. Notice how a keyframe is added at the end of each of the motion tween in frame 250 after you move everything. This will cause everything that was below the stage to move gradually upwards until it is on the stage.

       
      8.  

      Pan Right—Now that we have completed the pan down camera movement, we have to work on the pan right. One clue as to how to do this is to notice that the ground and fence and entire scene that we drew is more than 2 times the width of the stage. This means that we will push everything to the left in our motion tween this time to simulate the pan right motion of the camera.

      This time, we will give this movement about 150 frames; so, in the tree_near layer, click in frame 400, hold down the shift key, and click in frame 400 of the ground layer, and extend the duration (F5). This time, do NOT include the moon and the stars.

       
      9.

      Once again make sure you do NOT deselect anything. Just hold down on the shift key and use the left arrow key on the keyboard to move everything selected to the left until the right edge of the ground is just hanging offstage to the right. Once again, notice how the keyframes were automatically added at the end of the duration.

       
      10.

      Finally, click in frame 225 of the moon and the stars layers and extend the duration (F5). There is no need to move them. They should just sit in the sky behind everything as the landscape pans by.


  11. INTRODUCE:
    1. Pushing-in to a shot:
    2. If at any point the animation seems too short or too long, then undo and redo it. You will have to adjust the number of frames, add more frames to make it slower, and remove frames if it needs to be faster. More than likely, below, the animation is much too fast which means EVERYONE WHO FOLLOWS THE INSTRUCTIONS BELOW SHOULD LOOK AT THE ANIMATION AND ADJUST THE NUMBER OF FRAMES UNTIL IT LOOKS RIGHT.

      1. Now that we have reached the cat, according to our storyboard we must push-in, or, in other words , get closer to the cat. To push-in simply means to push the camera closer to the object of interest. In this case, it is the cat. We have already passed all of the characters and we have already seen the landscape, or setting, of our story. When we reach the cat, we will truly begin telling the story.

        The sequence of movements we are completing now, the pan and push-in, is known as the establishing sequence. It is called this because it establishes, or sets up the beginning of the animation, and tells us all of the most important information about the setting and the main characters. In the nursery rhyme, Hey, Diddle, Diddle!, our script, and our storyboard, the beginning starts with the cat. Therefore, when we reach the cat, we will begin telling our story.

        Now that we have reached the cat, we can begin telling our story, so we push-in, or, we get a little closer so as to get a better look, to pay closer attention to what we will see. This is what the "camera" does for us when it gets closer.

      2. We will start where we left off at frame 225. But let us first analyze the scene: if we look at the stage, we see that all that is left there are the cat, the fence, the house, the ground, the moon, the stars, and the shadow from the fence. The cow, the dog, the tree, etc, all have already passed across the stage and left the area. They are no longer part of the current shot. That is limited to the cat and the house behind, for the most part. As a result, when we push-in to the cat, we do not need to deal with those things that are off-stage, only what is on-stage.

        We will first lock and hide those layers we do not currently need: tree_near, dog, cow, shadow, and tree_far. Furthermore, since we will not be making the moon and stars larger, we will also lock those layers.

      3. Next, we want to scroll over to determine where we want the next keyframe to be. We'll give ourselves about 50 more frames to complete the next camera action, the push-in. So, we need keyframes in frame 275.

        Click in frame 275 in the top layer we are working with, the cat layer, and add a keyframe (F6). Repeat this for the fence, shadow, house, and ground layers.

      4. Next, we need to select those new keyframes. To do this, click in frame 275 of the cat layer, hold down on the shift key, and then click in frame 275 of the ground layer. This should select the keyframes in all those layers, and highlights them. If it does not do this, then try again. you should also notice that it selects everything on the stage. This is what we want.

      5. Now, turn on the outlines for all the layers except the cat layer. This will allow us to see everything, but also see through them. It will help us when we make everything larger.

      6. Then select the free transform tool (Q), hold down on the shift key, and grab one of the corners and make the selection much larger.

      7. If you are not sure about the size, whether it is big enough or whether it is too big, then move move everything at once not just the cat so that it is on top of the stage. Make certain that the cat is almost the same height as the stage. If it is still not big enough, then repeat the above action: hold on the shift key and grab the corner to make it even larger.

      8. When it is the correct size, make sure the cat is on the stage and that you can see its entire body within the confines of the stage.

      9. Now, add a motion tween to all of those layers between the keyframes.

      10. Extend the duration (F5) of the stars and moon layers to frame 275.

      11. So that the viewer can see the cat at this point, enlarged like this to what we call a medium shot for a moment, we must increase the number of frames. If we look at the timeline right now, we see that the motion tweens end at frame 275, and that's it. Everything is this large for only that one frame. In order for it to last longer we should extend the duration for a few frames, say 20 or 25 more frames, out to frame 300.

        To do this, click in frame 300 of the cat layer and select F5. Repeat this for the fence, shadow, house, ground, moon, and stars layers.