Hi everyone, I'm sorry for missing class this week, but below you'll find the blog posting. Please pay attention to the homework that is due next week. We don't want to get behind on the Final Project, which will be an animation of the nursery rhyme "Hey, Diddle, Diddle!". You will find drawing exercises and examples, as well as the storyboard for the animation. In addition, you will find at the bottom a little animation we are going do do for practice in class. We will start on that next week. Carter-
- TOPICS:
- LINK Homework and Quiz info for next week
- LINK The storyboard for our animation
- LINK Review: Drawing Examples —Trees & Clouds
- LINK Review: Drawing Examples —Trees & Clouds
- HOMEWORK:
- Draw:
Last week I asked you to work on your mid-term projects. You needed to draw either on paper or in the computer a cartoon of a dog and a cow. I asked that you draw them so that their "LOOK" goes together. What I mean by this is that they should have a similar aesthetic. They should look like they belong in the same animation.
As mentioned, I told you that you may draw this on paper or in the computer. Whichever media you decided to use was fine with me, as long as it was also colored. You may use other cartoons as examples to get ideas, but your drawing MUST be original.
This week, even though I was not in class today, I want you to continue your drawing. You must add a cat to the list of characters you must draw, and you also need to draw a setting.
To find out what sort of setting you must draw, check out the storyboard below. This will be the story we are going to animate this semester. For now, however, your drawings do NOT have to be in the computer, but they should be colored. You may also choose a different setting if you so choose. In the past students have decided to put this story in an urban setting, or even in space. What you decide to do is entirely up to you. Just be creative.
- Quiz:
Obviously, we did not have a quiz this week; so, you should be prepared to take the QUIZ in the beginning of the next class NEXT WEEK. This quiz will test you over your knowledge of how to create graphic symbols and motion tweens, as well as keyboard shortcuts for the following: save, open, print, undo, copy, cut, paste, extending-the-duration, convert to symbol, and the tools in the toolbar. You should also know how to create a motion-tween.
- STORYBOARD: below you will find links to each of the pages of the storyboard containing 3-frames each. Your animation MUST follow along with this storyboard. If you wish to make changes, please feel free to do so; however, you must RE-DRAW the frames of the storyboard that you wish to be different. To do this, all you need to do is sketch them out by hand and show them to me.
- LINK Frames 1-3
- LINK Frames 4-6
- LINK Frames 7-9
- LINK Frames 10-12
- LINK Frames 13-15
- LINK Frames 16-18
- LINK Frames 19-21
- LINK Frames 22-24
- LINK Frames 25-27
- LINK Frames 28-30
- LINK Frames 31-33—not yet complete.
- SIMPLE DRAWING EXERCISES:
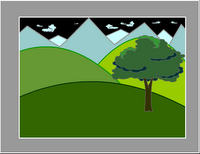
Last week in class we put some of our flash skills—drawing, creating symbols, creating new layers—to work for us in creating an actual drawing, creating an actual scene of something recognizable, a landscape. To the right here, you will see a series of images of a couple things might go into creating a simple landscape, a cloud and a tree. For our snowman story, this is not required for you to draw, they are simply examples of how to draw some things for you to practice with. 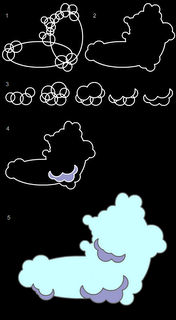

You can use this as an example of how to start your snowman story; however, since we are doing a winter scene with a snowman, perhaps this springlike drawing will not be quite what you want. It can serve as a way to draw various things you DO need, however, like hills, mountains, clouds. The main things that will probably change are the colors and the fact that trees in winter do not have green leaves for the most part. - Creating a simple Graphic Symbol:
- Once you draw your cloud or tree, it should be converted to a symbol (F8) like many of the other much more simple objects we have draw thus far, ovals and rectangles mostly.
- To do so, after you have drawn your cloud, for instance, you must choose the selection tool (V) and select the entire cloud.
- Then select F8, convert to symbol.
- Give it the name cloud, select graphic for behavior and then click okay.
- Now you will see that it has a blue box around it when it is selected. If you de-select by selecting escape or by clicking on the background somewhere, you will see the blue box disappears.
- One thing you should remember is that since the cloud is now a symbol, you must not double-click on it, as this will take you into symbol-edit mode for the cloud.
- If you do wish to edit your symbol, then do double-click on it; however, you must remember to exit symbol-edit mode by clicking on Scene 1 in the upper-lefthand corner of the window.
- If you select F11 or ctrl-L the Library will open up. To close, you simply select F11 orctrl-Lagain. Once open, you will see a smaller representation of your circle symbol there. If there are more symbols, you will see them all listed there. Here is where your symbols are stored. What is on the stage is known as a symbol instance. It is like a clone, or a copy of what is in the library. Symbol instances may be deleted from the stage without affecting the symbol in the library. However, take great care of your symbols in the library. Do not delete the symbols from the library if you are using them in your movie. If you delete the symbols in the library, they will also be deleted from the entire movie.
- You may use as many symbol instances as you need. All you need to do is drag an instance from the library onto the stage.
- After you draw the tree, you should do the same and convert it into a symbol too (F8).
- Creating a Simple Landscape:
- If you haven't drawn your tree or cloud yet, or if you have not yet converted them into symbols, then look at the above exercise to do so first: LINK
- Once you have created your symbols, make sure that for now you have only one instance of each of them on the stage. Click one time on the tree and cloud to make sure they are symbols. If the blue box appears around them when they are selected, then they are probably symbols. Next, look in your library (ctrl-L) and make certain both symbols are there. If so, then you're all set, so delete both of them from the stage, but careful not to delete them from the library.
- Next, in the timeline, double-click where it says layer 1 and type the name ground
- Then, choose the rectangle tool (R) and draw a rectangle over the bottom part of the stage. Adjust the fill and stroke colors of the rectangle if you need to.

- Manipulating Layers:
When creating an animation, it is important to put different objects on different layers, to segregate your content. This is important for several reasons, but primarily because there must only be one symbol per layer when using motion tweens. - Now, lock the ground layer and add a new layer.
- Name this new layer, hills.
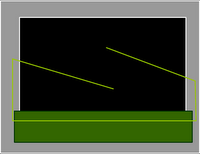
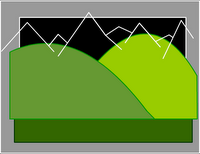
- Choose the line tool (N) and draw two diagonal lines above the ground rectangle as shown in the picture below.
- Continuing with the line tool (N) and starting with the end points of those two diagonal lines, draw a box over the ground rectangle.
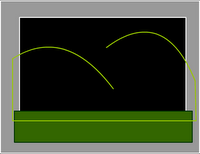
- Once you do this, choose the selection tool (V) convert those two diagonal lines into curves.
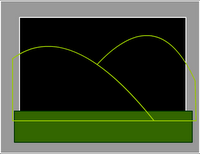
- And continuing with the line tool (N), stretch the end of the lines so that they attach to each other to form a kind of upside-down W.
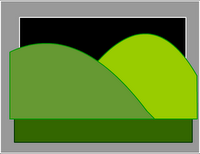
- Choose a new fill color and then, using the paint-bucket tool (K), fill in the two shapes with different colors. Notice that the one on the left is a little darker than the one on the right. Since we are creating a landscape, and since these are hills, it is good to note that as things get further away, they appear to get lighter. This is why the hill on the right is lighter than the hill on the left, because it is further away.
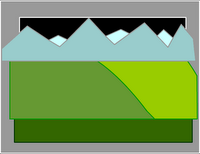
- Now, lock the hills layer, and create a new layer called mountains.
- With the line tool (N) draw a zig-zag line to mimic the outline of distant mountans.
- Further with the line tool (N) draw a box that connects the end points of the mountain lines and over-laps the hills.
- Choose a couple of light fill colors and using the paint-bucket tool (K), color in the mountains.
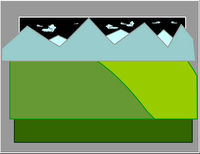
- Now, lock the mountains layer, and create a new layer called clouds.
- Open the, library (F11 or ctrl-L), and there you will see your cloud symbol.
- Drag several, cloud instances, from the library onto the stange.
- Change the size and shapeof the clouds using the free-transform tool (Q). Make certain they are small as they are in the background and far away.
- Lock all of the layers.
- Then, rearrange the layers to the following order: top-ground, 2nd-hills, 3rd-mountains, and bottom-clouds.
- Next, unlock the groundlayer.
- Using the selection tool (V) convert the horizontal line to a curve to make a kind of gentle slope.
- Save and test (ctrl-enter) the movie, and it will look like the following image.
- Now, lock the ground layer.
- Add a new layer and name ittree-middle.
- Open the library (ctrl-L or F11), and drag an instance of the tree symbol onto the stage.
- Use the free-transform tool (Q)to resize the tree appropriately. Place it so that it rests on the nearest hill
- Now, lock the tree-middle layer.


- Creating a simple Graphic Symbol:
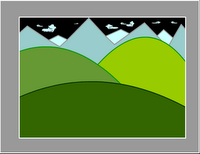
- Foreground & Background: When objects are placed in a landscape, to give the illusion of depth, they take on different sizes. Objects that are far away from the viewer, the camera, appear smaller. Objects that are nearer appear larger. To convey this relative size and relative distance, the free-transform tol (Q) is used to resize an object such as trees that are either further away or closer to the camera.
- Add a new layer and name ittree-near.

- Open the library (ctrl-L or F11) again, and drag another instance of the tree symbol onto the stage.
- Again, use the free-transform tool (Q)to resize the tree until it is much larger. It should hang off the edges of the stage significantly. Place it so that it rests along the left edge.
- Next, select this tree on the stage using the selection tool (V), open the properties bar, and click where it says color and select brightness. Make the tree darker as it is nearest to the viewer.
- Now, lock the tree-near layer.
- Open the library (ctrl-L or F11) once again, and drag a third instance of the tree symbol onto the stage.
- Use the free-transform tool (Q)to resize the tree until it is much smaller. Place it so that it rests on one of the background hills.
- Add a new layer and name ittree-near.
- Dim, Hazy Distance: To further provide an illusion of distance, objects that are further away from the viewer, from the camera, appear dimmer or lighter or hazier. This is due to the effects of the atmosphere and water-vapor. Color and symbol effects may be used to help provide this effect.

- Select this smallest tree on the stage using the selection tool (V), open the properties bar again, click where it says color and select brightness. Make the tree lighter as it is furthest from the viewer.
- Save and test (ctrl-enter) the movie, and it will look like the following image.
- Finally, you may also add these effects to the clouds, making them lighter, or, perhaps somewhat transparent with alpha.
- Save and test (ctrl-enter) the movie, and it will look like the following image.
- SNOWMAN ANIMATION: Below, you will see a review the first step of the snowman animation as it is described in the first paragraph of the Snowman story and as we started 2 weeks ago.
Notice two things: first, how many layers there are and what their names are; second, how many frames each part of the animation takes. Remember, the lavendar areas are the motion tweens.
- Create your first layer and name it mountains.
- In this layer, draw the two mountains in the background as described in the Snowman Story.
- Now lock this layer.
- Create a new layer and name it ground.
- In this layer draw the ground in the foreground where the snowman will be standing.
- Now lock this layer too.
- Create a new layer and name it snowman1.
- In this layer, draw the large circular snowball that will form the parts of the snowman. You may use any tools you wish to do this. I used the brush tool (B) to make mine because I didn't want it to be an absolutely perfect circle as the oval would probably have done. I then created a radial gradient and used the paint bucket (K) tool to fill it up. Afterwards, I selected the brush tool (B) again and made some marks to make the snowball seem irregular.
- Once you complete your snowball, select the entire thing and convert it to a symbol (F8).
- Give it the name snowball, select graphic for type, and then click okay.
- Place the snowball symbol off the stage to the right-hand side.

- Choose the free transform tool (Q) and make the snowball a little bit smaller. To do this, remember, you must hold onto the shift key and drag on one of the corner handles.
- Now, in the timeline in the snowman1 layer, click in frame 1 and then release.
- Once you release, click again and hold down. Before you let go, drag it to frame 10 and then release. This will move the keyframe to that frame, frame 10.
- Next, since the part of the animation in which the snowball rolls into the stage is supposed to take one and a half seconds (check the Snowman Story), this means that it should take 18 frames. Recall, the frame rate is 12 frames per second. This means for one second there are 12 frames of animation. Therefore, if you need 1 1/2 seconds of animation, you need 18 frames. I altered this a little and made it 20 frames in my animation. What you should do next, then, is to click in frame 30 of your animation in the snowman1 layer and add a keyframe (F6).
- Now, move the snowball to a position on the stage somewhere in the middle.

- Make the snowball larger now using the free transform tool (Q).
- Once you have done this, in the timeline between the keyframes in the gray area, right-click and select create motion tween.
- Then, click somewhere in the timeline in the lavendar area of new motion tween.
- Open up the properties bar and locate where it says rotate.
- Since the snowball is moving to the left, we want it to rotate in the counter-clockwise direction, so select CCW, and the number of times it should rotate is one.

- Next, click in frame 35 of each layer one at a time and extend the duration (F5).
- Lock the snowman1 layer, add a new layer, and name it snowman2.
- Click in frame 35 of this layer and add a new keyframe (F6).
- From the library (F11 or crl-L), drag an instance of the snowball symbol onto the stage off to the right side like the first one.
- Make this snowball even smaller than you did the first one.

- Next, click in frame 55 of this layer, and add a keyframe (F6).
- Move the smaller snowball next to the first one and then make it a little larger.

- Now add your next motion tween between those two keyframes, frames 35 and 55.
- You should also make this rotate CCW and one time.
- In the next eight (8) keyframes we will use a frame-by-frame animation that lifts the second snowball onto the first and then makes the two snowballs squash down and back up. So, click in frame 56 and add a keyframe (F6).
- Now, lift up the second snowball and move it upwards slightly and a little to the left.
- Then click in frame 57 and add a keyframe (F6).
- Repeat this action 2 more times for frames 58 and 59.


- The next four frames follow the squash and stretch effect of the weight of the second snowball as it comes to rest onto the first snowball.
squash it down a little:
 squash it down a little more:
 make them taller again, even taller than they started as a kind of bounce back:
 put them back to their original size: