- HOMEWORK:This week, work on your animation projects.
- You should do the fade-in/fade-out, and
- the panning motions;
- You should also try to do the push-in that was demonstrated last week and which is in the blog for week 8.
- If you haven't completed it yet, you should continue work on creating complex symbols for your characters as demonstrated in class, and various postings, including last week's.
- For your character symbols, attempt to add the necessary animation. All of your characters should have blinking eyes according to the blog posting this week. Remember, give it a try. The work that you do is important even if you're not successful and it turns out badly. You can always repair what you've done badly the first time.
- STORYBOARD: below you will find links to each of the pages of the storyboard containing 3-frames each.
- LINK Frames 1-3
- LINK Frames 4-6
- LINK Frames 7-9
- LINK Frames 10-12
- LINK Frames 13-15
- LINK Frames 16-18
- LINK Frames 19-21
- LINK Frames 22-24
- LINK Frames 25-27
- LINK Frames 28-30
- LINK Frames 31-33
- REVIEW:
- Fading-in/Fading-out:
- First, assemble your layers. Make certain that there is only one object per layer. Also, make certain that each object is a symbol.
- Next, if you haven't done so yet, please make sure that your setting, your landscape, is about 2 times the width or more than the stage. Also, place it way below the stage. Notice in the image below that stage is the small dark-gray rectangle in the upper left and that the scene is assembled below. It is also several times wider.
- Now, lock all layers.

- Add a new layer to the top of the stack named fade.

- Now, in this new layer, draw a black rectangle without a stroke that covers over the entire stage.
- Convert this black rectangle into a graphic symbol named fade.
- Next, click in frame 25 of the fade layer and extend the duration (F5).
- Right-click in the gray area that appears and select create motion tween.
- Notice that the gray area is now blue. Click in the LAST FRAME of the blue motion tween.
- Next, on the stage, click once on the black rectangle symbol there to select it.
- In the properties panel where it says style select alpha.
- Change the alpha setting to 0%. Notice that the black rectangle becomes invisible. If you drag the red playhead at the top back and forth, you'll see that the black rectangle gradually fades out.
- Click in the bottom two stars layers and extend the duration (F5).
- Lock the fade layer and add a new layer named title.
- Place the title layer just below the fade layer.
- Click in frame 30 of the title layer and add a keyframe (F6). Also, if you haven't yet done so, create a title, convert it into a graphic symbol, and make certain it is on the stage here in frame 30 of the title layer.
- Go to the properties and change the alpha setting to 0%. Again, notice that the object becomes transparent and invisible.
- Then, click in frame 55 of this layer and extend the duration (F5).
- Right-click in the gray area that appears and select create motion tween.
- Click in the last frame of this blue motion tween.
- On the stage, click one time on the title to select it: make certain that you select the TITLE symbol on the stage and not something else by accident.
- In the properties, change the alpha setting to 100%. Notice that the title returns to full visibility.
- Extend the duration of the bottom two stars layers out to frame 55.
- Click in frame 90 of the title layer and add a key frame (F6).
- Click now in frame 105 of the title layer and add another keyframe (F6).
- Click once on the title on the stage to select it.
- Then, in the properties panel, change the alpha setting to 0%
- Extend the duration of the bottom stars layers out to frame 105
- Panning Motions:
- Scroll backward to frame one in the timeline.
- Unlock all the layers except the title layer, the fade layer, and the two stars layers.
- Click in frame one of the tree near layer, hold down on the shift key, and then click in frame one of the moon layer. This selects all those keyframes at the same time. Release.
- Now, click again on the blue selected frames, hold down, drag to frame 120, and release.
- Notice down below that all objects have blue boxes around them. This means that all those objects are select.
- Now scroll over until you see frame 220. Click in frame 220 of tree near, hold down on the shift key, and click in frame 220 of moon to select all those layers at the same time.
- Being careful not to deselect, extend the duration of those layers at the same time (F5).
- Still maintaining your select, right-click in the blue selected frames and choose Create Motion Tween.
- Continuing NOT TO DESELECT ANYTHING, and noticing down below that everything in the stage area is still selected with blue boxes around them, move everything up into the stage area. The best way to do this is to use the arrow keys on the keyboard. Make certain that you move everything a little bit above the bottom of the stage.
- Zoom-in to the lower left corner of the stage.
- Then, STILL MAINTAINING THE SELECTION AND NOT DESELECTING ANYTHING, in your timeline, put all layers into outline mode by clicking on the hollow black box at the top next to the lock and the eye.
- Then, click on the colored outline box of the ground layer to turn offthe outlines for that layer.
- Drag everything down a little to cover over the corner of the stage. Make certain that none of the stage is visible below the ground or to the left of it.
- Hide all layers.
- Show the ground layer only and turn on its OUTLINES.
- Notice how you can see that the ground outlines are a little outside of the stage area, below and to the left.
- Next, lock and hide all layers except the stars layers, and turn off their outlines. Extend the duration of those layers out to the end.
- Scroll back over to frame 120 and add keyframes (F6) to those two layers in that frame.
- Hide the stars_near layer, scroll to the last frame, and add a motion tween to the stars_far layer.
- Making certain you are in the last frame, move the stars_far symbol upwards on the stage a little.
- Lock the stars_far layer, UNlock the stars_near layer, and add a motion tween to this layer.
- Making certain again that you are in the last frame of the motion tween, move the stars_near symbol on the stage upwards a bit MORE than you did previously with the stars_far.
- Add another keyframe to those layers in frame 225.
- Lock the moon layer, and then, click in frame 325 of tree_near, hold down on the shift key, and click in frame 325 of hills.
- Extend the duration (F5) of those layers.
- Being careful NOT to deselect anything, move everything on the stage to the left until the cat and house are sitting on the stage area.
- Select the last frame of the bottom layers (moon and stars).
- Extend the duration (F5) of the stars and moon out to frame 325.
- Pushing-in:
- Lock all the layers EXCEPT those layers which have objects which are CURRENTLY ONSTAGE. This includes: cat, cat_shadow, ground, house, house_shadow, tree_far, tree_far_shadow, and hills. Then, select frame 335 in those layers. In order to do this, you will have to hold onto the COMMAND key (for Macs) or CONTROL key (for PC) while you select the frames.
- Then, add a keyframe (F6) in that frame to all those layers.
- Now, select frame 435 using the same method in the same layers. Now, this time, extend the duration (F5).
- Select the free-transform tool (Q).
- Turn on outline for those layers. This will allow you to see everything on the stage, but also see the stage. The reason we want this is because we will be making everything quite large to simulate the push-in. They will be so large that most of the stage will be covered up.
- Next, turn OFF the outlines for the CAT LAYER. The reason for this is because the cat is going to be our guide. When we enlarge everything, we want to do it all at the same time, and when the cat is about the height of the stage, we will know it everything is big enough.
- Now, hold onto the SHIFT key and drag onto one of the corners and make everything MUCH LARGER. You will notice that this drags many things offstage. That is no problem, just make certain that you DO NOT deselect.
- At some point, however, you will not be able to drag any furth. Just stop, and using the selection tool (V) move everything back onto the stage by grabbing onto the CAT and dragging it back to the stage area and releasing.
- If it is not big enough, then select the free-transform tool (Q) again. Simply hold onto the shift key again and make it bigger.
- Then, once again, drag it back onto the stage when sufficiently big. If it is too big, be careful to hold onto the shift when reducing size as well.
- Turn OFF the outlines so that you can see everything properly.
- Select frame 435 of the stars and moon and extend the duration (F5) of those out to the end as well.
- Graphic Symbols—making the entire drawing one single symbol:
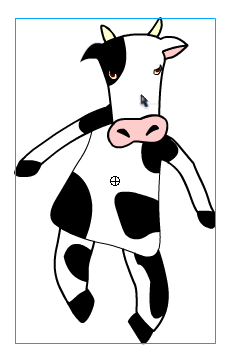
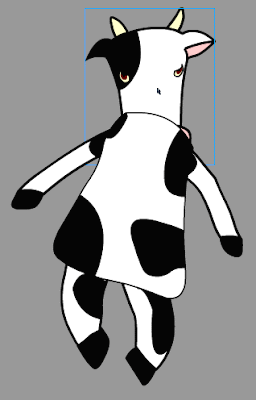
- Following last Monday's class, after you have drawn your cow character, select the entire drawing (if there is nothing else on the stage, click in frame 1 of the layer to this).
- Click on F8 to Convert to Symbol.
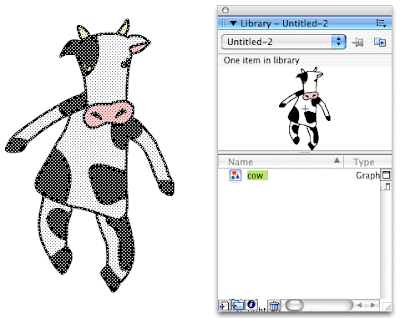
- Give it a unique name (name it cow), select graphic for behavior, and then click okay.
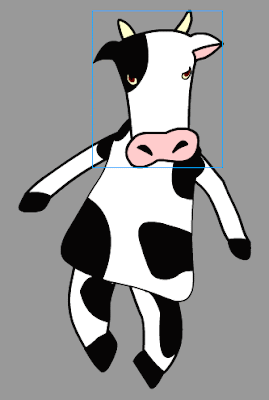
- Complex Symbols—creating nested symbols: symbols within symbols
- Sometimes it is necessary to create complex symbols. In the following situation, we will make the head, the body, the legs, and the arms into separate symbols. First, we must break apart the graphic symbol that we have already created. To do this, select the cow symbol by clicking on it one time.
- Next, break the symbol apart by selecting ctrl-B. At this point, the drawing of the cow on the stage is no longer a symbol instance; however, if you look into the library, you will see that you still have the symbol there.

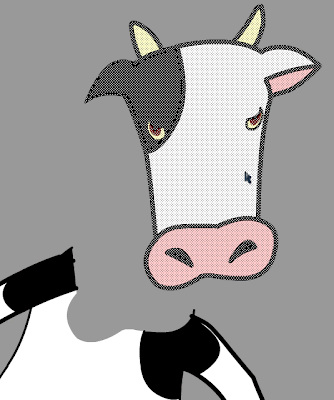
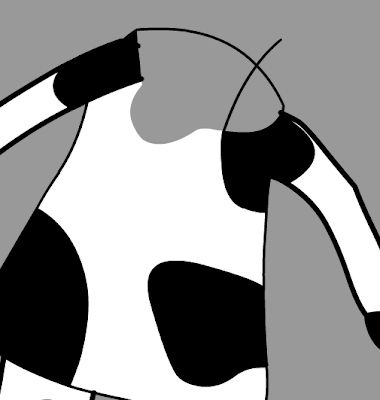
- Now, select only the head of the cow. To do this you must use the arrow tool, and zoom up very close. Make certain you get all of the pieces of the cow’s head in the selection. It is very important that you do not leave any piece of the head out of your selection.
- Next, once you select the head, choose the arrow tool (V) and move the head away from the body.
- If you find that there are pieces of the head left out, little fragments of lines or color, then undo until the head goes back into place, and try selecting again.
- Once you select the head and move it away from the rest of the cow’s body, then convert it into a symbol (F8).
- Give it the name cow_Head, select graphic for behavior, and then click okay.
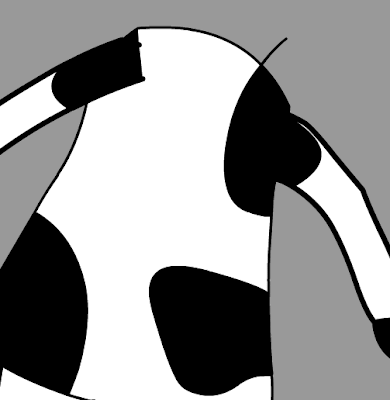
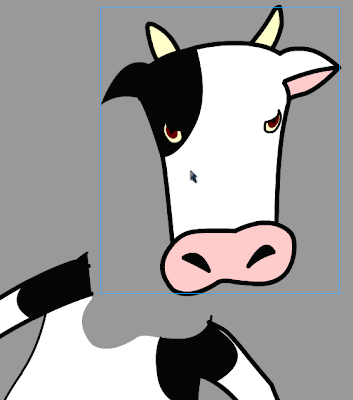
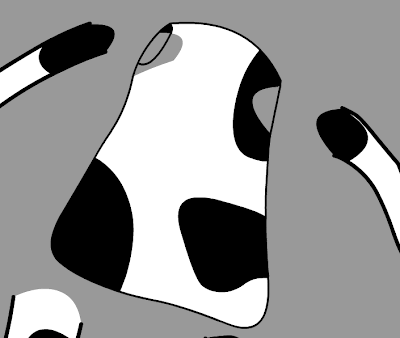
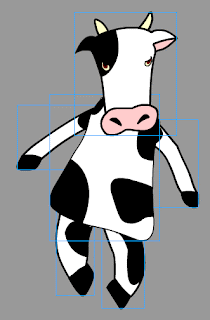
- Now, look at the cow’s body. You should notice that there are little gaps in the body where the head used to be. Fill in these gaps and round them out.

- Once done, let us try and select one of the arms of the cow; however, you will probably soon see that in such a case, when you click on the black area, it selects the black on the arm, as well as all the black on the body. So, we'll have to separate the arm from the body by drawing a single line. We can do this with a colored line so that we can see it stand out from the rest of the drawing. We will also know that we have to later delete the line. We can do so with both arms right now.
- Now, double-click on one of the arms and move it away from the body. Then, do the same thing to the other arm.
- Remember to delete those lines that you drew to separate the arms from the body.
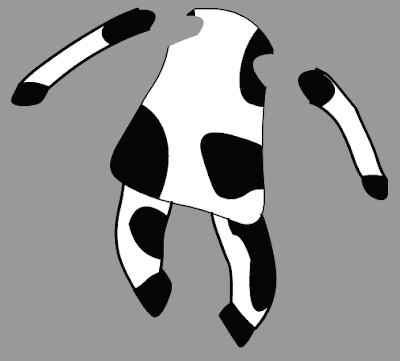
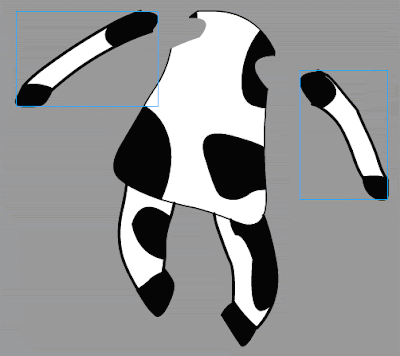
- Then, select one arm at a time and convert them to graphic symbols. Name them cow_arm1 and cow_arm2.
- We need to do the same thing for the legs, although with this particular cow, they will be a bit easier than the arms. Therefore, simply select each leg, one at a time, move them away from the body, and convert them into symbols named cow_leg1 and cow_leg2. Don't forget to round out the tops of the legs, and to remove the strokes there.

- Before we convert the body into a symbol, you may have noticed that there are gaps missing from the body, chunks cut out where the arms used to be. We must fill these two areas in before we convert the body into a symbol. To do this, we must use the line tool again to close off the spaces, and then the paint bucket to fill them in.
- Finally, select the body, and convert it to symbol (F8). Give it the name cow_body, select graphic for type, and then click okay.
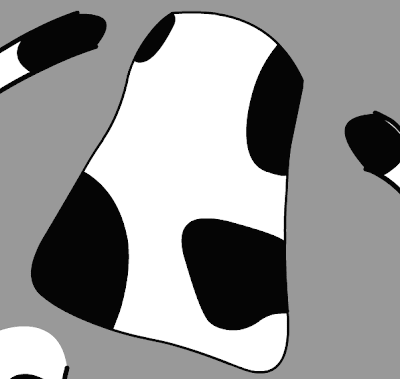
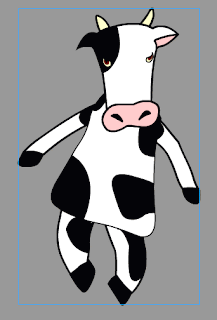
- Now that we have at least five graphic symbols, you may try to put them all back into place, as in a puzzle. You will find that the head is below the body, partially hidden by the body. To correct this, select the head by clicking on it one time.
- Next, go to Modify >> Arrange >> Bring to Front. This will put it above the body. Repeat this for the arms so that they are also above the body.
- Movie-Clip Symbols—combining all the individual graphic symbols into one single movie-clip symbol:
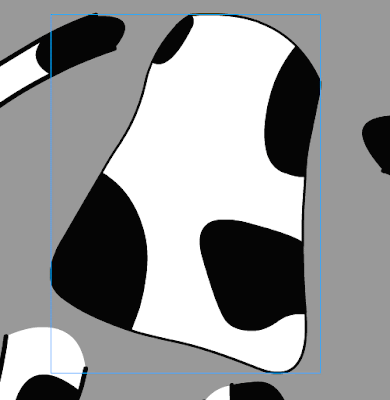
- Once the cow is reassembled and looks like it did originally, we will put it together into a single symbol. As it is now, it is composed of six parts: the head and the body, the two arms, and the two legs; but we want to envelope all of these parts together in a single symbol. To start, we must select all the symbol instances, each of the body parts together.
- They must all be selected in order for this to work, so make certain you see blue boxes around them all. If so, then click on F8, convert to symbol.
- Give this new symbol the name of cow_mc, select Movie Clip for type, and then click okay.
- Animated Symbols I—creating symbols that move: Moving Head
-
The reason we are doing this is because we are going to make the head move back-and-forth as the script calls for. The graphic symbol is usually a static symbol, meaning there is no movement within it. The movie-clip symbol, on the other hand, is a dynamic symbol. It often is a symbol that contains animation. In order to make our new movie-clip into an animated symbol, we must therefore put animation inside of it. To do this we must go into the symbol (into symbol-edit mode). As we have learned, to go into symbol edit mode we must double click on the symbol or symbol instace.
So, using the arrow tool (V), double-click on the cow_mc symbol. Once you do this, look in the upper-left-hand corner of the window and you will see scene 1, cow_mc. This tells us we are currently working inside the cow_mc movie-clip, in symbol-edit mode for the cow_mc symbol.
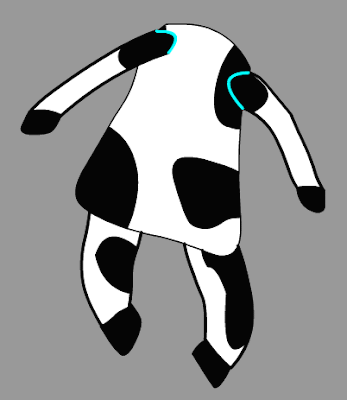
- Since we are going to animate the head to make it move back and forth, we must put the head into its own layer. We can actually put all of the various body parts, the various graphic symbols into their own layers. To do this we must first select all of the symbols. Then, right-click on the selection and choose distribute to layers.


- Next, look at all your layers. You will see that this action distribute to layers has given the layers the same names as the symbols within them; however, you might also see a few layers without names, that instead have the names layer 8 or layer 3 or layer 13. More than likely, these layers have little fragments that should be discarded and deleted. Before you do such an action, however, you should always make certain there is nothing in the layer that you need. When you are done, you should only have the layers with the names of the symbols.
- Now you have six layers, one with the head another with the body, others with the arms, and still others with the legs. To make certain everything is in the right place, hide one layer at a time. If you hide the body layer the body of the dog should disappear from the stage. If you hide the head layer, the head should disappear from the stage. Do this for each layer to make certain you have all the necessary parts.
- Lock all of the layers except the head layer.
- Choose the zoom tool (Z) and zoom into the head.
- Then, choose the free-transform tool (Q) and select the head.
- You should notice the little white circle in the center. This is the center-point of the head symbol. Click and drag it straight down to the top of the nose. This is the point around which the head will rotate when we make the head move back-and-forth.


- Now rotate the head a little.
- Next, click in frame sixteen (16) of the head layer and extend the duration (F5)—don’t be alarmed if the body disappears.
- Once you do this, right-click and add a motion tween to the duration of the head layer.
- Then, click back in frame eight (8) of the head layer. You can make sure that you’re in frame eight (8) by checking to see if the red playhead in the timeline is over frame eight. Once you are in frame eight, then, choose the free-transform tool (Q) again.
- If the center-point is not still above the top of the snout move it there again, and then rotate the head to the other direction.
- Hit enter to see the head move back and forth once.
- You should notice that the body disappears but the head remains. That is because there is only one frame in the body layer. When the playhead moves past frame one, then the body disappears. Therefore, we just need to extend the duration of the body out to frame sixteen (16). To do that, you just click in frame 16 of the body layer and hit F5 to extend the sprite (aka extend the duration).
- Next, click back on scene one in the upper-lefthand corner to exit symbol-edit mode.
- And lastly, select ctrl-enter to view the animated movie-clip looping.

-
-
Animated Symbols II—creating symbols that move: Blinking Eyes

The next thing we'll do is create another movie-clip, but this one will be inside of the cow. We need to have the cow's eyes blinking, which means its eyes need to be animated. Remember, animation is just the change of something across a span of time. It may change colors, or positions, or it may change the way it looks, its size for example; or, in our case, the eyes will change the way they look, from being opened to being closed. Any of these things will constitute animation. Therefore, we will use a movie-clip symbol for the eyes.
We've already drawn the eyes inside the cow_head symbol, so we must go in there to begin. Using the selection tool (V), double-click on the cow_mc symbol, and then double-click again on the cow_head symbol. These two actions will take you inside of the two symbols. If you look in the upper-lefthand corner, you should see.

- Once inside the cow_head symbol, zoom into the eyes, so they are large and fill up most of the screen area. We will need to get into there pretty close.

- Then, select the eyes. Remember, to select more than one thing, you must hold down on the shift key to add to your selection. Before doing so, however, lines must be drawn to separate the eyes from teh rest of the face. Please note the green lines that were drawn to do just that.
- Once you select both the eyes, convert them to a symbol (F8), and name it eyes_mc, choose movie clip for behavior.
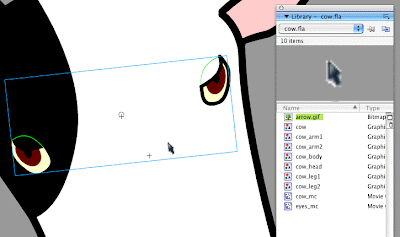
- Open up the library, and make certain that the eyes_mc symbol is there in the list.

- Then, select the eyes ON THE STAGE and delete. Notice that there are holes where the eyes were.
- These holes need to be filled up with the paint bucket (K) tool.

- Then, from the library, drag the eyes_mc symbol back onto the stage.
- Double-click on the eyes_mc symbol, to enter into symbol-edit mode.
- Delete the little green lines that were drawn earlier from the eyes.
- Next, click in frame 28 and add a keyframe (F6).


-
Since one eye is surrounded by black, and the other eye is surrounded by white, we are going to treat them each a little differently. First, make certain you are in frame 38. Then, for the one in the black, choose the paint bucket (K) and fill in the whole eye with black. As a result, it should completely disappear.
For the other eye, the one surrounded by white, delete the stroke at the top, and fill the rest of the eye with white. As a result of this, just a kind of U-shaped stroke remains. This gives the illusion of a closed eye.
- Finally, click in frame 30 and extend its duration (F5).

- Click back on scene 1 when you have done this to exit the symbol.


 >
>
 >
>


