Hi class, I was a bit disappointed in the number of students who brought work to class in our class. Despite the lack of work (for which I am very nervous knowing that the midterm is due soon) it seems you guys have a pretty good handle on what we're doing in here. Many of you had questions about simple things, which would be cleared up if you actually did some of the required work, so please try to work hard this week. It will pay off in your midterm project and your grade. Good luck, Carter-
- TOPICS:
- HOMEWORK:This week, finish the first draft of your mid-term projects. They will be due in two weeks.
- Snowman Story:
- You should make a second attempt at the 1ST PARAGRAPH of the Snowman Story.
- By the next class, you should have up to the end of the 2ND PARAGRAPH of the Snowman Story completed in your animation. You do not have to have the 2nd paragraph done perfectly, but you should at least try to do it even if it seems difficult. I will go over how to do the 2nd paragraph in class.
- Quiz: Even though I didn't give you a quiz this week, I promise you that I will in our next class. So please be prepared to take a QUIZ in the beginning of the next class. This will include knowing how to create graphic symbols and motion tweens, and keyboard shortcuts for the following: save (ctrl-s), open (ctrl-o), print (ctrl-p), undo (ctrl-z), copy (ctrl-c), cut (ctrl-x), paste (ctrl-v), paste-in-place (ctrl-shift-v), keyframe (f6), extending-the-duration (f5), convert to symbol (f8), the library (f11 or ctrl-L), and all the shortcuts for the tools in the toolbar.
- Link: for the mid-term project—You will see a couple links below for the snowman story. They are both for the same story, they just are in different formats, .doc, and .pdf. EVERYONE will need to read the first download, The Snowman Story, as it provides the guidelines for your midterm animation:
- Snowman Story:
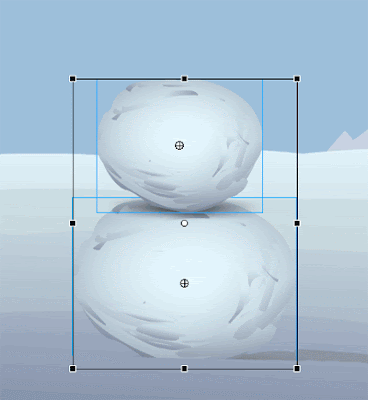
- REVIEW—SNOWMAN ANIMATION I: Below, you will see a review the first step of the snowman animation as it is described in the first paragraph of the Snowman story and as we started for homework 2 weeks ago and in class this week.
Notice two things: first, how many layers there are and what their names are; second, how many frames each part of the animation takes. Remember, the lavendar areas are the motion tweens.
- Create your first layer and name it mountains.
- In this layer, draw the two mountains in the background as described in the Snowman Story.
- Now lock this layer.
- Create a new layer and name it ground.
- In this layer draw the ground in the foreground where the snowman will be standing.
- Now lock this layer too.
- Create a new layer and name it snowman1.
- In this layer, draw the large circular snowball that will form the parts of the snowman. You may use any tools you wish to do this. I used the brush tool (B) to make mine because I didn't want it to be an absolutely perfect circle as the oval would probably have done. I then created a radial gradient and used the paint bucket (K) tool to fill it up. Afterwards, I selected the brush tool (B) again and made some marks to make the snowball seem irregular.
- Once you complete your snowball, select the entire thing and convert it to a symbol (F8).
- Give it the name snowball, select graphic for type, and then click okay.
- Place the snowball symbol off the stage to the right-hand side.

- Choose the free transform tool (Q) and make the snowball a little bit smaller. To do this, remember, you must hold onto the shift key and drag on one of the corner handles.
- Now, in the timeline in the snowman1 layer, click in frame 1 and then release.
- Once you release, click again and hold down. Before you let go, drag it to frame 10 and then release. This will move the keyframe to that frame, frame 10.
- Next, since the part of the animation in which the snowball rolls into the stage is supposed to take one and a half seconds (check the Snowman Story), this means that it should take 18 frames. Recall, the frame rate is 12 frames per second. This means for one second there are 12 frames of animation. Therefore, if you need 1 1/2 seconds of animation, you need 18 frames. I altered this a little and made it 20 frames in my animation. What you should do next, then, is to click in frame 30 of your animation in the snowman1 layer and add a keyframe (F6).
- Now, move the snowball to a position on the stage somewhere in the middle.

- Make the snowball larger now using the free transform tool (Q).
- Once you have done this, in the timeline between the keyframes in the gray area, right-click and select create motion tween.
- Then, click somewhere in the timeline in the lavendar area of new motion tween.
- Open up the properties bar and locate where it says rotate.
- Since the snowball is moving to the left, we want it to rotate in the counter-clockwise direction, so select CCW, and the number of times it should rotate is one.

- Next, click in frame 35 of each layer one at a time and extend the duration (F5).
- Lock the snowman1 layer, add a new layer, and name it snowman2.
- Click in frame 35 of this layer and add a new keyframe (F6).
- From the library (F11 or crl-L), drag an instance of the snowball symbol onto the stage off to the right side like the first one.
- Make this snowball even smaller than you did the first one.

- Next, click in frame 55 of this layer, and add a keyframe (F6).
- Move the smaller snowball next to the first one and then make it a little larger.

- Now add your next motion tween between those two keyframes, frames 35 and 55.
- You should also make this rotate CCW and one time.
- In the next eight (8) keyframes we will use a frame-by-frame animation that lifts the second snowball onto the first and then makes the two snowballs squash down and back up. So, click in frame 56 and add a keyframe (F6).
- Now, lift up the second snowball and move it upwards slightly and a little to the left.
- Then click in frame 57 and add a keyframe (F6).
- Repeat this action 2 more times for frames 58 and 59.


- The next four frames follow the squash and stretch effect of the weight of the second snowball as it comes to rest onto the first snowball.
squash it down a little:
 squash it down a little more:
 make them taller again, even taller than they started as a kind of bounce back:
 put them back to their original size:

- INTRODUCE—SNOWMAN ANIMATION II: Below, you will see an introduction of the next step of the snowman.
- New Layer: The first thing we need to do is create a new layer for the third snowball of the snowman. I call this layer snowman3.
- Third Snowball: Next, we need to open the library and bring a third instance of the snowball symbol onto the stage. Remember, since this snowball is going to be on top as the head, it needs to be smaller than the other two snowballs. Also recall, that the snowball needs to grow a little larger as it rolls toward the snowman in the center.


- Motion Tween: After we move the snowball toward the center near the other two snowballs and make it a little larger, we need to add a motion tween in the timeline.

- Rotation: The final step in this first part is to make sure that the snowball rotates as it moves onstage.

- Frame-by-Frame: The next step is to create a frame-by-frame animation that has the third snowball being lifted up on top of the other two. Each time you move the snowball a little, you must add a new keyframe (F6).
1. 2. 

3. 4. 

5. 6. 

7. 8. 

- Squash: The final step in this part of the animation is again to create the squashing motion of the snowballs as the third snowball is placed on top the other two. This comes in two parts: the squashing and then the slight bounce back. Both are created with a frame-by-frame animation.
1.Here is how the snowman starts. 2.Here the snowman is squashed down a little from the previous frame. 

3.The snowman is squashed down a little bit more in this frame. 4.Here the snowman bounces back up even a little taller than it started. 

5.A nd finally here, the snowman goes back to its original size. 
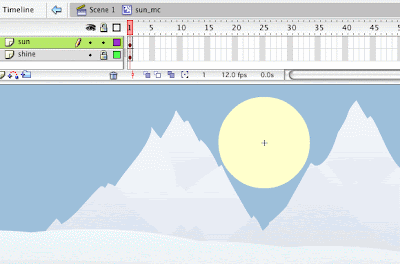
- Rising Sun: If you look at the beginning of the second paragraph of the snowman story, you will see that the sun is supposed to rise as the second snowball rolls into the center of the stage. This is a simple enough thing to do in the animation; however, if you think about a sun and how it looks, it will not only rise up from the horizon behind the mountains, but it also has to shine like a sun shines. This means that the sun must be animated in two ways: It must rise up from behind the mountains; and, it must also shine.
These are two completely different kinds of animations. One only happens one time—the rising of the sun; and one happens repetitively over and over again as if in a kind of loop—the shining. When this kind of multiple animation happens, particularly when there is a repetitive animation, then that is a signal that you must use a movie-clip symbol.
- Layer: Lock all the layers, add a new layer and name it sun.
- Keyframe: From reading the snowman story, we know that the sun begins to rise as the second snowball begins to roll in from offstage. So, at the top of the timeline, click on the red playhead and slowly drag it until you see the 2nd snowball appear. Once you do, click in this frame in the sun layer and add a keyframe (F6).
- Draw: Remember, almost always the first thing you must do is to draw your object. In this case, we will be drawing our sun. So, click in the keyframe you have just added and let's keep it simple by drawing a basic cirle.

- Select: Using the selection tool (V), select the circle that you have drawn.
- Convert: Then convert it into a symbol (F8). Give it the name sun_mc, choose movieclip for type, and then click okay

- Edit: Now enter into edit mode for this symbol by double-clicking on it. If you look in the upper left corner, you will see the name of the symbol sun next to where it says Scene 1. This tells you that you are in edit mode for that symbol.

- Convert Again: Now select the sun on the stage again and convert it once again into a symbol (F8).
- Graphic: This time, you will give it the name sun, select graphic for type, and then click okay. By doing this, what you have done is nested two symbols. This means that you have a symbol inside of another symbol, and in this case the graphic symbol is inside the movieclip symbol. This is necessary if you want to do two types of animation at the same time.

- Copy: To start the animation here in the movieclip symbol, we need two identical copies of the sun. So, select the sun on the stage and copy (ctrl-C) it.
- Layers: Next, lock the first layer, add a second layer and name it sun. Now name the first layer, the one on the bottom, shine.
- Paste: Select frame 1 of the sun layer and paste-in-place (ctrl-shift-V) and then lock this layer.
- Keyframe: Unlock the shine layer, and then click in frame 10 and add a keyframe (F6).

- Enlarge: Click in frame 10 of the shine layer, select the free-transform (Q) tool, hold on to the shift key and grab one of the corner handles to slightly enlarge the sun.

- Alpha: Now, choose the selection tool (V), click once on the enlarged circle on the stage, and open the properties bar. Click where it says color, select alpha, and then choose 0%. This will make the circle completely invisible.

- Motion tween: In the timeline, right-click in between the keyframes and select create motion tween when the menu pops down. The circle will enlarge at the same time it becomes invisible.

- Extend: Lastly, click in frame 10 of the sun layer and extend its duration (F5). The top layer has the sun graphic symbol just sitting there doing nothing. The bottom layer has the sun expanding and disappearing. This give the appearance of the sun shining.

- Exit: Exit symbol-edit mode by clicking in the upper left where it says Scene 1.
- Layer: Temporarily, we want to make sure that the sun layer is the top layer in the stack, so drag it up there if it is not already at the top.
- Start Position: Now, on the stage, drag the sun so that it is below the mountains.

- Keyframe: Next, drag the red playhead again until you see that the 2nd snowball is sitting on top of the first one. Once you see this, stop dragging, click in this frame in the sun layer and add a keyframe (F6).

- End Position: On the stage, move the sun so that it has risen up into the sky between the mountains.
- Motion tween: Right-click in the timeline between the keyframes and select create motion tween.

- Layers: Move the sun layer so that it is below the ground and mountains layer.
- Save: Finally, save (ctrl-S) and test (ctrl-enter) your movie.
- SYMBOLS: There are three (3) different kind of symbol behaviors in Flash, but so far we have learned only about one kind, Graphic Symbols. We have used these symbol types primarily to create motion tween and to create re-usable graphics, graphics that may be used many times; however, there are many more uses for symbols, and last week's class was an introduction to another behavior type: Movie-Clip symbols.
- Movie-Clip and Graphic Symbols: The main distinction between these two types of symbols is that one is a dynamic symbol, and one is primarily a static symbol. In other words, one involves activity (animation) and interactivity, and the other involves in-activityor the lack of activity or interactivity. When a web graphic or object is dynamic, such as a movie-clip, it usually involves animation or user interactivity of some kind. Static graphics, on the other hand, are NOT usually active and NEVER interactive. They are static, still, non-moving, inactive.
- Graphic Symbols: Graphic symbols are the most basic symbol types. It is the only type that we have learned up to now, but it possesses all of the fundamental properties of symbols: they are reusable graphics, in which multiple instances of the symbol may be used without drawing more, and without adding filesize to your movie; they allow you to create motion tween animations, and they reside in the library (ctrl-L || F11). All types of symbols have these three fundamental properties, but a graphic symbol is probably the type that is used most often. As its name suggests, it is for graphics, any ordinary drawing or object that you would create in Flash. Some graphic symbols do contain animation within them; however, the vast majority will not.
- Movie-Clip Symbols: Next to graphic symbols, Movie-Clips are the most widely used type of symbol; and, in fact, for web-sites or interactive movies, they are perhaps even more widely used than graphic symbols. This type of symbol, being dynamic, often contains animation within it. Unlike simple graphic symbols, which usually contain a simple drawing of some type, movie-clips may contain within themselves entire animations. More often, however, they contain snippets of animation, brief animated sequences. Furthermore, one of the properties of movie-clips is that they may be allowed to play endlessly in a loop. As a result, those brief snippets of animation are played over and over and over again, such as an eye blinking, a raindrop falling, or a bird's wings flapping. If the sequence requires repetitive movement of some kind, then it is ideal for being placed in a movie-clip symbol. The blinking eyes here are an example: Notice that not only do the eyes blink repetitively, but they also move from side to side at about the same interval. What we have here are basically three (3) layers: an eyelid layer, an iris (colored part of eye) layer, and then the eyeball (white of eye) layer. The eyelid layer simply blinks, moving up and down; and the iris layer moves side to side. In these two layers are just two simple motion tweens. I've used the free transform tool (Q) also, to give the illusion of 3D animation, but it is really flat as a pancake 2D Flash animation. The bottom layer, the eyeball layer, does nothing, so it just has one keyframe and simply sits there at the bottom. All of this is inside a movie-clip symbol. We will cover something like this in another class, but feel try to try it on your own until then.

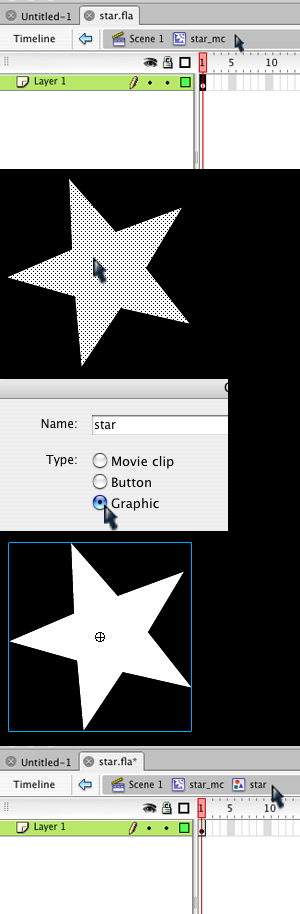
- Creating a Movie-Clip Symbol: Next, we will create our own movie-clip symbol. Doing this is like creating the simple graphic symbols that we have made up to now. We will start first with a drawing:
- Using the line tool (N) or the polygon tool (R - press down on the tool until the polygon shows itself, then click on options in the toolbar to select STAR) to draw a star. It may be any type of star you like, 5 points or 6 points, fat or skinny.
- Once drawn, select the selection tool (V), look closely, and select only the stroke or outline of the star.
- Now hit delete.
- Make sure the selection tool (V) is still activated, and then select the star on the stage.
- Choose convert to symbol (F8).
- Give it the name star_mc, select movieclip for behavior, and then select okay.
- Once done, it should have a blue box around it just like a graphic symbol does when it is selected.
- Nesting Symbols: The star symbol is now a movie-clip symbol; however, it is not yet animated. We must create the animation inside of the symbol with symbol-edit mode.
- As you should know, to do this we must double-click on the symbol instance on the stage.

- Once you do so, look in the upper left-hand corner of the stage. There, it should say Scene 1 - star_mc. This means you are in symbol-edit mode for the star symbol. If it is not there, you should try double-clicking again on the star on the stage. To proceed, you must be in symbol-edit mode.
- Now, select the selection tool (V) and select the star on the stage by double-clicking on it. Once you do so, you should be able to tell it is selected because it should have the little dots all over it.
- Eventually, we are going to put animation inside of this movie-clip symbol by creating a motion-tween. But as you can see, this star graphic has little dots all over it when it is selected, and as you know, it must have a blue box around it.
- Try not to get confused, but remember we are inside the movie-clip symbol. Try to imagine it as a completely separate movie inside the movie-clip, and if we are going to make this star into a motion tween, we need to convert it into a graphic symbol. But before we do, once again, look in the upper left-hand corner and see if it still says Scene 1 - star_mc to make sure you're still inside the symbol.
- If so, then make sure the star is selected, and then convert to symbol (F8).
- Give it the name star, select graphic and then click okay.
- Now, it should have a blue box around it when it is selected. This means you have a nested symbol. In other words, it is a symbol WITHIN a symbol. To see for yourself, double-click on the new symbol there on the stage. Then look in the upper left-hand corner again, and you should see Scene 1 - star_mc - star: the star graphic symbol is inside the star_mc movie-clip symbol which is in Scene 1 of the main movie.
- To exit symbol-edit mode, click on where it says Scene 1 in the upper left.
- As you should know, to do this we must double-click on the symbol instance on the stage.
- Animating a Movie-Clip Symbol - Shining Star: Now that we have our symbols nested, a graphic symbol inside of a movie-clip symbol, we can go about creating our animated movie-clip.
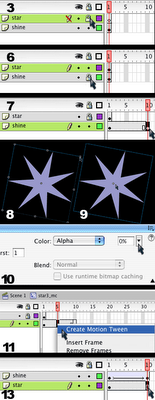
- Select the selection tool (V) and double-click on the star on the stage to go into symbol-edit mode for the star_mc movie-clip.
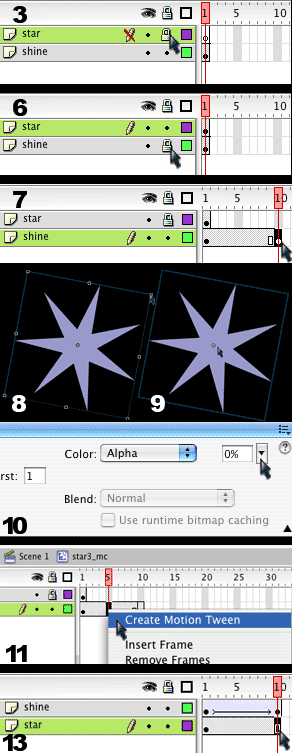
- Once inside the movie-clip symbol, name the first layer star and add a second layer.
- Name the second layer shine and lock it
- Click in frame 1 of the star layer and copy (ctrl-C).
- Now lock the star layer and unlock the shine layer.
- Click in frame 1 of the shine layer and paste (ctrl-V).
- Now, click in frame 10 of the shine layer and add a keyfame (F6).
- Select the free transform tool (Q), hold onto the shift key, grab the corner of the star, and make it larger.
- After that, choose the selection tool (V) and select the star on the stage by clicking on it one time.
- Then open the properties bar, click where it says color, and set the alpha to zero.
- Now click in the timeline between the two keyframes, and add a motion tween.
- Also in the timeline, drag the shine layer so that it is below the star layer.
- Next, click in frame 10 of the star layerand extend the duration (F5).
- Finally, exit symbol-edit mode by clicking on Scene 1 in the upper left-hand corner.
- Save and test the movie, you will see your star shining over and over in an endless loop.
- Movie-Clip and Graphic Symbols: The main distinction between these two types of symbols is that one is a dynamic symbol, and one is primarily a static symbol. In other words, one involves activity (animation) and interactivity, and the other involves in-activityor the lack of activity or interactivity. When a web graphic or object is dynamic, such as a movie-clip, it usually involves animation or user interactivity of some kind. Static graphics, on the other hand, are NOT usually active and NEVER interactive. They are static, still, non-moving, inactive.


No comments:
Post a Comment